In this tutorial, you'll learn how to find features in the Locate pane using the layers configured for search.
Get the data
The data for this tutorial is available for download from ArcGIS Online.
- Go to the item description web page of the geocoding tutorial data.
- Click Download and save the file locally.
- Unzip the downloaded file.
Find a feature on the Locate pane using a layer created from a local feature class
In this exercise, you'll use the geocoded feature class that was created when you geocoded the table of addresses in the Geocode a table of addresses tutorial, and you'll configure it for search. If you have not completed that tutorial, do so before continuing.
- Start ArcGIS Pro.
- Sign in to ArcGIS Online, if necessary.
- Create a new project based on a blank template.
- On the Insert tab, click New Map
 .
. A basemap appears.
- On the Map tab, in the Layer group, click the Add Data drop-down menu, and click Data
 . Browse to the saved location for the output feature class that you created in the Geocode a table of addresses tutorial, and double-click the feature class to add it to the map.
The feature class is converted to a layer and is displayed as points on the map. You can also see that the layer is listed in the Contents pane.
- On the Map tab, in the Inquiry group, click the Locate drop-down arrow and click Layer Search.
The Locate pane appears.
- In the Locate pane, on the Locate tab, click the Options button
 and click Provider Settings to change the active view of the pane.
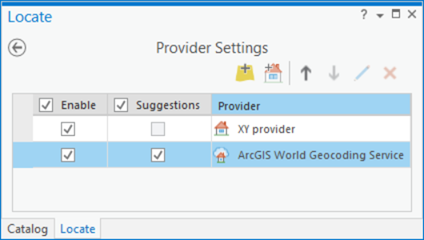
The Provider Settings view in the Locate pane is now displayed, and you can see a list of available providers. This list includes any locators that were added automatically through your portal connection as well as any locators that you added to your project locally or through a server connection. You can drag and drop the locators into any order you prefer, modify locator properties, remove locators from your project, and enable or disable locators on the Provider Settings view. Since this tutorial focuses on searching for features in layers, you can disregard the locators.
Note:
Layers added to the map do not appear automatically in the Locate pane. You must configure them for search first.
- Add the layer from the map to the Locate pane by clicking the Configure layer for locate button
 .
. 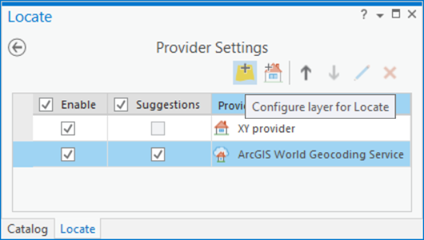
The Select Layer dialog box appears, which displays all layers currently available in the Contents pane.
- Select the layer from the list of layers displayed in the Select Layer dialog box, and click OK.
The Locate pane now displays the Configure Layer for Locate view for the layer you selected.
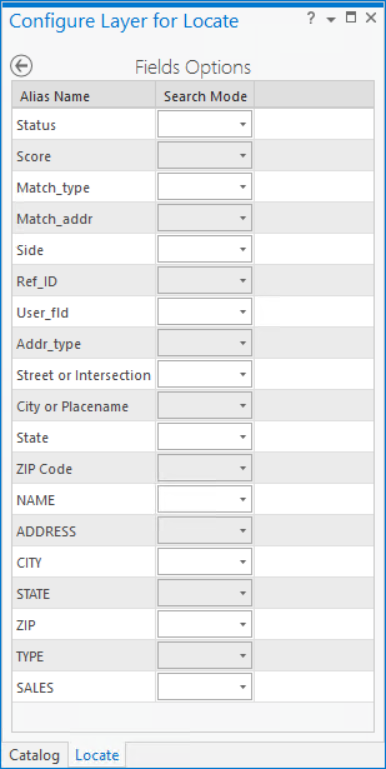
- To configure the NAME field for search, use the drop-down menu associated with the NAME field and choose Contains, which allows you to perform an approximate search.
You could instead chose Equals, which configures the NAME field for an exact search, but this option can be somewhat limiting, as input must exactly match the field value you're searching for and is case sensitive. It is best to use Equals when searching for a field value that is always precise; for example, a long ID number containing both numbers and letters.
- To save your search configuration, click the Save and return to Provider Settings arrow
 in the upper left corner of the pane.
A message appears suggesting that you index the fields you configured for search. Click Yes. Indexing improves performance and is worth doing if your dataset is large and you'll be searching it frequently.
The Locate pane now displays the Provider Settings view again, and your newly configured layer is displayed in the list of Providers. You can rearrange the order of locate providers in the list, which determines the order in which the search is performed, as well as the order in which results are returned and displayed in the Locate pane.
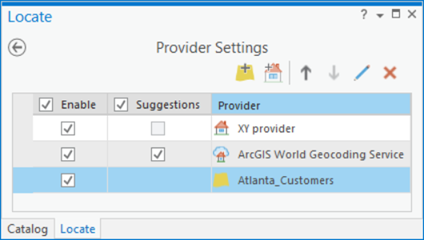
- Disable all locate providers listed on the Provider Settings view in the Locate pane except for the layer you just added.
Disabling other locate providers is not necessary for search to function, but for the purposes of this tutorial, it will be helpful to see only the results you are interested in. Additionally, performance is improved when searching against fewer locate providers.
Note:
After completing the tutorial, re-enable the Providers that you routinely use on the Providers Settings view in the Locate pane.
- Click the Back to Locate pane button
 in the upper left of the pane to go back to the Locate tab, type gas in the search box, and press Enter.
Four results display in list format under the name of the layer you just configured, and they display as points on your map. Notice that each has matched because the value in the NAME field contains the word gas.
- Double-click the result in the list.
The map zooms to the item's location.
Tip:
You can also right-click the candidate and click Zoom To
 or Pan To
  on the right of the selected item to zoom or pan to the location of the result on the map.
 Click Zoom To All
 in the Menu
  to zoom to all matched results on the map.
Click Detailed View
 in the Menu
  to display the details of each match result.
 - Right-click a candidate in the list and click Show Details to view a pop-up with detailed information about a feature result.
The Pop-up window appears. You can perform several actions, including selecting the feature.
Find a feature on the Locate pane using a layer created from an online feature service
- Start ArcGIS Pro.
- Sign in to ArcGIS Online, if necessary.
- Create a new project based on a blank template.
- On the Insert tab, click New Map
 .
. A basemap appears.
- On the Map tab, in the Layer group, click the Add Data button
 . On the Add Data dialog box, click All Portal
  , type restaurants in the search box, and press Enter. Double-click Naperville_Restaurants and double-click Restaurants to add it to the map.
The feature service is converted to a layer and displayed as points on the map. You can also see that the layer is listed in the Contents pane.
- On the Map tab, in the Inquiry group, click the Locate drop-down arrow and click Layer Search.
The Locate pane appears.
- In the Locate pane, on the Locate tab, click the Options button
 and click Provider Settings to change the active view of the pane.
The Provider Settings view in the Locate pane is now displayed, and you can see a list of available Providers. This list includes any locators that were added automatically through your portal connection, as well as any locators you added to your project locally or through a server connection. You can drag and drop the locators into any order you prefer, modify locator properties, remove locators from your project, and enable or disable locators on the Providers Settings view. Since this tutorial focuses on searching for features in layers, you can disregard the locators.

Note:
Layers added to the map do not appear automatically in the Locate pane. You must configure them for search first.
- Add the layer from the map to the Locate pane by clicking the Configure layer for locate button
 .
. 
The Select Layer dialog box appears, which displays all layers currently available in the Contents pane.
- Select the Restaurants layer from the list of layers displayed in the Select Layer dialog box and click OK.
The Locate pane now displays the Configure Layer for Locate view for the layer that you selected.
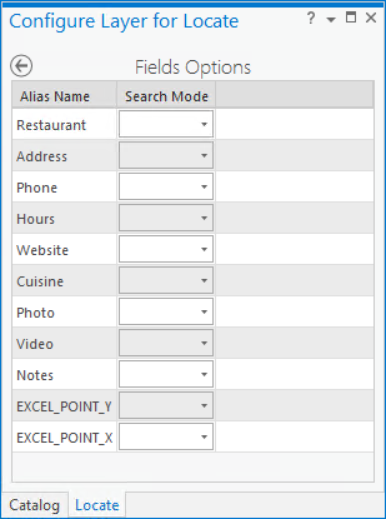
- To configure the Cuisine field for search, click the drop-down menu associated with the Cuisine field and choose Contains, which allows you to perform an approximate search.
You could instead choose Equals, which configures the Cuisine field for an exact search, but this option can be somewhat limiting, as input must exactly match the field value that you're searching for and is case sensitive. It is best to use Equals when searching for a field value that is always precise; for example, a long ID number containing both numbers and letters.
- To save your search configuration, click the Save and return to Provider Settings arrow
 in the upper left corner of the pane.
You will not be prompted with the message suggesting you index the fields you configured for search for online feature services.
The Locate pane now displays the Provider Settings view again, and your newly configured layer is displayed in the list of Providers. You can rearrange the order of locate providers in the list, which determines the order in which search is performed, as well as the order in which results are returned and displayed in the Locate pane.
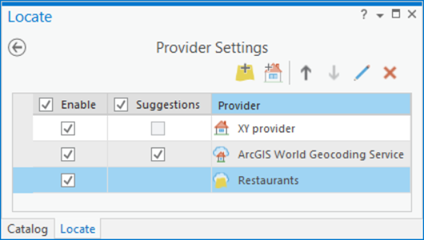
- Disable all locate providers listed on the Provider Settings view in the Locate pane except for the layer you just added.
Disabling other locate providers is not necessary for search to function, but for the purposes of this tutorial, it will be helpful to see only the results you are interested in. Additionally, performance is improved when searching against fewer locate providers.
Note:
After completing the tutorial, re-enable the Providers that you routinely use on the Providers Settings view in the Locate pane.
- Click the Back to Locate pane button
 in the upper left of the pane to go back to the Locate tab, type frog legs in the search box, and press Enter.
One result displays in list format under the name of the layer you just configured, and it displays as a point on your map. Notice it has matched because the value in the Cuisine field contains the words frog legs.
- Double-click the result in the list.
The map zooms to the item's location.
Tip:
You can also right-click the candidate and click Zoom To
 or Pan To
  on the right of the selected item to zoom or pan to the location of the result on the map.
 Click Zoom To All
 in the Menu
  to zoom to all matched results on the map.
Click Detailed View
 in the Menu
  to display the details of each match result.
 - Right-click a candidate in the list and click Show Details to view a pop-up with detailed information about a feature result.
The Pop-up window appears. You can perform several actions, including selecting the feature.