License:
Available with a Basic, Standard, or Advanced license.
A traverse is a sequence of lines that is defined by entering a set of dimensions. Start a traverse by clicking Traverse  under COGO in the Modify Features pane. The Modify Features pane is located under the Edit tab on the ArcGIS Pro ribbon.
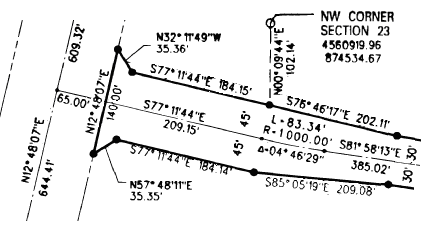
A traverse is commonly used to create linear features described on a survey or engineering plan. A survey plan is used by surveyors and engineers to record the location of features relative to each other using dimensions and coordinates. Surveyors and engineers record the locations of features such as parcel boundaries, road centerlines, and utility easements. For example, the survey plan shown below uses dimensions to describe a road centerline and the parcel boundaries adjoining the road (offset from the centerline). The road centerline and parcel boundaries comprise a number of straight and curved lines.

COGO dimensions
Coordinate geometry (COGO) is used to define features relative to each other using dimensions and coordinates. In a traverse, COGO dimensions are entered to create a sequence of lines and curved lines.
When using the Traverse tool  , straight lines are entered using a bearing and distance, and curved lines are entered using curve parameters such as tangent bearing, radius, arc length, chord, chord bearing, and delta.
When entering a traverse, a line feature layer in which to create the traverse lines must be chosen. If the line feature layer is COGO enabled (has COGO attribute fields), the Traverse tool will populate the COGO fields with the entered dimensions.
Use the Enable COGO geoprocessing tool to add the following COGO fields to a line feature class:
| Field | Description | Type |
|---|---|---|
Direction | The direction (bearing) of the line from its start point to its endpoint. | Double (Nullable) |
Distance | The distance between the start point and endpoint of the line. | Double (Nullable) |
Radius | The distance between the curved line and the curve centerpoint. | Double (Nullable) |
ArcLength (Alias: Arc Length) | The arc distance between the start and endpoint of the curved line. | Double (Nullable) |
Radius2 | Stores the second radius for spiral curves. Can be infinity. | Double (Nullable) |
Use the Disable COGO geoprocessing tool to disable COGO-related labeling, symbology, and fields on a line feature class. Once COGO is disabled on the line feature class, the COGO fields can be deleted.
Open and closed traverses
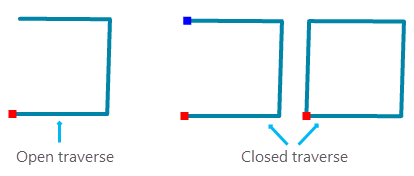
The Traverse tool creates open and closed traverses. An open traverse ends on no defined closing location. A closed traverse has a closing location that can be at the same location as the start point or at a different location.

Traverse misclose
In a closed traverse, the endpoint of the last line of the traverse may not match the specified closing location. The difference between the traverse endpoint and the closing location is the traverse misclose. In the case of a loop traverse, the misclose is the difference between the endpoint of the last line of the traverse and the start point of the traverse.
The misclose information of a closed traverse is displayed under the traverse grid in the Modify Features pane. Misclose Distance is the distance between the endpoint of the traverse and the defined closing location (or start location in a loop traverse). Misclose Ratio is calculated by dividing the misclose distance by the total distance of all lines in the traverse and expressing this value in reciprocal form. The following is an example:
0.89 (misclose distance) ÷ 2466.05 (total length) = 0.00036090
1 ÷ 0.00036090 = 2770.8
Misclose Ratio = 1:2771
You can automatically close a traverse by specifying a misclose tolerance for the Traverse tool. To specify a misclose tolerance, open the Traverse tool, click Options  and click Traverse Options. Type a misclose tolerance and click OK on the Traverse Options dialog box. If the endpoint of the traverse lies within the specified misclose tolerance of the defined closing location or start location, the two points are snapped together and the traverse is closed.
Tip:
You can also check Closed to automatically close the traverse regardless of whether the misclose distance lies within the specified misclose tolerance.
Set a closing location
To set a closing location for the traverse, click Set Closing Location any time after setting the start location. A closing location can be created in any of the following ways:
- Snapping to an existing point or vertex of any layer in the active map
- Snapping to an existing point in the traverse
- Right-clicking the map view and entering a set of x,y coordinates
- Clicking anywhere on the map view
If no closing location is set, the traverse is either an open traverse or a loop traverse that closes on the start location.
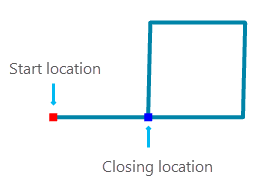
A loop traverse can close on a different location from the start location. In this case, a closing location is defined on an existing traverse point. For example, the loop traverse shown below closes on the endpoint of the first line of the traverse.

Misclose adjustment
Once a traverse is closed onto its closing location, the traverse is automatically adjusted to eliminate the misclose, if there is a misclose. The traverse uses the Compass adjustment method to distribute the misclose among the individual traverse legs.
The compass adjustment method assumes the dimensions of all legs in the traverse were measured with the same level of precision. The misclose is distributed equally among all the legs in the traverse. The method also assumes that the measurement error occurs in both the direction and distance dimensions of the traverse legs. Adjustments are therefore reflected in both the distance and direction values. Each traverse leg is adjusted proportionally to the total misclose.
Units
Before entering a traverse, make sure the distance and direction units are set correctly for the project. The unit formats for the traverse fields are set under Units on the project Options dialog box. To open the Options dialog box, click the Project tab and click Options. The traverse curve parameter field is set by default to Arc Length and can be changed by clicking the drop-down arrow on the field.
Learn more about setting unit formats for editing
When entering dimensions into a traverse grid field, you can temporarily change the unit format of a field by clicking the units drop-down arrow and selecting a different unit format. The dimension entered for that unit format will be converted to the unit format set for the field under the project settings once focus is shifted away from the field. You can also type an override character to enter a dimension in a different unit format. For example, if the unit format of the field is feet, typing 15m converts 15 meters to feet. If you are entering curved lines with different curve parameters from radius and arc length, you can use curve parameter overrides.
Start entering a traverse
To start entering a traverse, click Traverse  under COGO in the Modify Features pane.
Tip:
The Traverse tool does not use an edit sketch. When a traverse leg is entered, a line feature is created in the specified line feature class. To undo a traverse leg and the creation of the line feature, click Undo on the Quick Access Toolbar or use the keyboard shortcut Ctrl+Z.
- Choose the line feature layer in which to create the traverse from the Layer drop-down list.
- Click Set Start Location to set the start point of the traverse.
Set a start location in one of the following ways:
- Snap to a point or vertex on any snappable layer.
- Right-click the map and enter an x,y coordinate.
- If necessary, click the template drop-down list next to the Direction field to choose a feature template for your traverse.
By default, the first feature template is used.
- If entering a closed traverse, click Set Closing Location to set the endpoint of the traverse.
For a loop traverse, there is no need to set a closing point, as the traverse should close onto the start location.
- Click the Direction field to begin entering your traverse dimensions.
Tip:
After entering your first traverse leg, you can click New to exit the current traverse and start a new one.
Open saved traverse lines
You can add previously entered and saved traverse lines to the traverse by tracing over the lines on the map. In this way, you can open and continue to enter a traverse at any time. Lines that are being traced must belong to a COGO-enabled line feature class and have populated COGO attribute fields. This ensures the correct dimensions are populated in the traverse.
To trace traverse lines, open the Traverse tool and click Modify in the Modify Features pane. Use the following guidelines when tracing traverse lines:
- Lines must be traced in the correct direction matching the COGO dimension.
- Multiple lines can be traced at a time. A separate entry for each two-point line is added to the traverse grid.
- An entry is added for each line the trace tool covers, even if only part of a line is traced.
- Lines are added to the traverse grid in the sequence in which they were traced.
- Editing the COGO dimensions of a traced line will edit and change the geometry of the line.
- For overlapping lines going in the same COGO direction, use the Select tool
 to select the line you want to trace.
To trace and add saved traverse lines to the Traverse tool, follow these steps:
- In the Modify Features pane, click Traverse
 under COGO to open the Traverse tool.
 - Choose the line feature layer in which to create the traverse from the Layer drop-down list.
Only lines in the selected target feature layer (the layer chosen from the Layer drop-down list) can be traced.
- Click Modify
 , hover over the first line you want to trace, and snap on it.
 - Drag the pointer over the remaining lines you want to trace. Click to complete the trace.
Lines can only be traced in the direction the COGO dimensions were entered.
Digitize a traverse
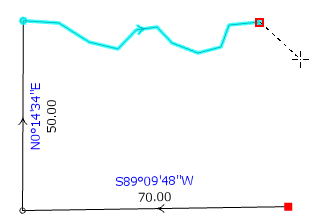
You can use edit tools to digitize traverse lines. You can digitize single, two-point lines and multisegment polylines. You would digitize a multisegment traverse line when the traverse follows a natural boundary, such as a river or a lake edge.

Edit tools are displayed under an empty traverse row in the traverse grid.

By default, the 2-Point Line tool  is selected as the digitize tool. The 2-Point Line tool creates a separate feature for each line that is digitized, and traverse lines are most commonly two-point lines. However, you would use the Line tool
  to digitize a polyline representing a natural boundary. The line tool creates a single feature for a multisegment polyline.
You can change which edit tools are available by configuring the feature template properties of the line feature layer.
Generated dimensions
When using edit tools to digitize traverse lines, dimensions are generated from the digitized line geometry and added to the COGO fields on the traverse grid. Dimensions generated from line geometry are displayed in angle brackets, for example, <N7°53'54"W> and <136.77>.
Note:
Generated dimensions are not labeled on the map or stored in the COGO fields on the line feature class. To label and store a dimension, click the field on the traverse grid, edit the dimension if necessary, and press Enter. The angle brackets are removed and the dimension is stored in the line's COGO fields.
Digitizing multisegment lines using tools such as Line  and Trace
  adds a new single row to the traverse grid for the entire polyline. Dimensions are generated for the straight line that's between the start and endpoints of the polyline and are populated in the Direction and Distance fields on the traverse grid.
Note:
If you click either of these fields and press Enter, the polyline is converted to the straight line between its start and endpoints. The dimensions are stored in the corresponding COGO attribute fields on the line feature class.
Tip:
When digitizing with the 2-Point Line tool, you can edit the generated dimensions in the traverse grid to store and label them. If COGO dimensions are partially edited, that is, only the distance dimension is edited, the digitized line is labeled Partial.