Table templates are created in the Manage Templates pane from a selected table or in the Attributes pane from a selected record. You can create multiple templates for the same table and use them with multiple feature templates.
Note:
To add a table template to a feature template the table must participate in a relationship class with the feature class as the origin.
In the Manage Templates pane
To create a table template in the Manage Templates pane, select the table in the layers view and use the tools the on the template view toolbar. By default, dragging a table onto the current map automatically creates a table template with default settings.
- If the relationship class does not exist, create it.
- On the View tab, click Catalog Pane
 , and expand Databases
  .
. - Right-click the geodatabase or dataset, click New, and click Relationship.
To learn more about creating relationship classes, see Create a relationship class.
- On the View tab, click Catalog Pane
- Open the Manage Templates pane using one of the following methods:
- On the Edit tab, in the lower right corner of the Features group, click the Manage Templates dialog box launcher
 .
. - In the Create Features pane, click Manage Templates
 .
.
The Manage Templates pane appears.
- On the Edit tab, in the lower right corner of the Features group, click the Manage Templates dialog box launcher
- In the pane, expand the map icon
 for the current map and click the table.
- If the table does not appear on the list, expand Databases
 in the Catalog pane. Expand the database containing your data, and drag the table onto the map.
- If the table does not appear on the list, expand Databases
- In the pane, on the toolbar, click the New drop-down arrow
 and click Template
  .
.The Template Properties dialog box appears.
- Click General.
- In the Name text box, type a name.
The OK button is enabled.
- In the Description text box, you can document the template with an optional description that you and your organization can search and find in the pane.
- In the Tags text box, the keyword for Table is automatically generated. You can delete it or add additional tags.
- To add a tag, type the keyword and press Enter.
- To delete a tag, click X.
- Click Attributes.
- In the feature attribute, type the attribute values you want automatically generated in the destination table when you create a new feature.
- Check the following optional settings to enable them:
- Show nonvisible fields— Shows all hidden attribute fields in the Template Properties dialog box.
- Prompt for attribute value— Shows the field in the Create Features pane below the tool palette for quick access.
- Click OK.
The template is saved and the dialog box closes.
In the Attributes pane
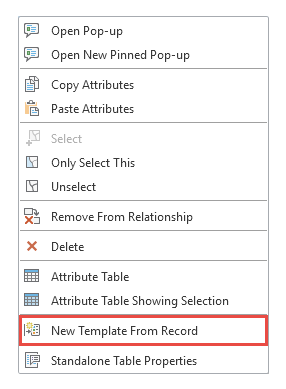
To create a table template in the Attributes pane, select an existing record in the selection tree view. By default, the attribute values for the template are set to match the record's current values.
- On the Edit tab, in the Selection group, click Attributes
 .
.
- Select a feature containing a record in the table for which to create a template.
- In the pane, expand the feature in the selection tree view, right-click the record, and click New Template From Record.
