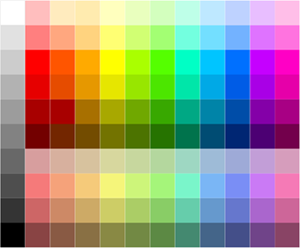
Color is a fundamental aspect of the symbols that are used to draw features, text, and graphics on maps, scenes, and layouts.

Color palette
The color palette appears any time you choose a color for something, most often a symbol, or a part of a symbol. It could also be the color of text, a map background, or a layout element. Regardless, the color palette works the same: click a color, it is applied immediately, and the palette closes.
The color palette shows all the available colors from all the current project styles, grouped by their style. Generally, this includes a standard set of RGB colors stored in a system style called ArcGIS Colors, which is part of every project by default. Adding additional styles (that contain colors) to a project—or adding colors to your Favorites style—adds colors to the palette.
To remove the default colors from the color palette (to work with a limited set), remove the ArcGIS Colors style from your project. This does not delete the colors, and you can add the style back to the project at any time. ArcGIS Colors contains only colors and color schemes; it contains no other style items.
Modify colors
You are not limited to the colors you see in the palette. They are there for easy access, but you can define and use any color you like. Choose one of the methods below to modify and adjust symbology color settings.
Eyedropper
The Eyedropper tool is available wherever a color palette is present, except from the Color Scheme Editor window. You can use the tool to pick a color from a layer in the active view and apply it to the current symbol. At the bottom of the color palette, click Eyedropper  to activate the tool.
When the Eyedropper tool is active, a square magnifier appears with the pointer to show the currently selectable color. To apply the color to the symbol, left-click the map, scene, or layout. After clicking a color, the symbol's color is set to the new color and the tool deactivates.
You can use the Eyedropper tool to choose a color from the active view only. You cannot click colors from the application's ribbons, panes, windows, or anywhere outside the ArcGIS Pro application.
Color Editor
At the bottom of the color palette, click Color Properties to open the Color Editor dialog box. Choose a color model and adjust the channel values. Click OK to apply the color.
Color models
Colors are defined by one of seven color models:
- RGB—An additive color model made up of red, green, and blue. This is the default.
- HSV—An additive color model made up of hue, saturation, and value (brightness).
- HSL—An additive color model made up of hue, saturation, and lightness (luminance).
- Lab—A device-independent color model made of absolute color values.
- Grayscale—A monochrome color model made up of only one channel varying from black to white.
- CMYK—A subtractive color model made up of cyan, magenta, yellow, and black channels.
- Spot—A color that is intended to be printed as a single ink on a single printing plate on a printing press. Spot colors are defined and managed differently from other color models in ArcGIS Pro.
When you use the RGB, HSV, or HSL color models, you can also enter a hexadecimal value in the HEX # box to define the color. Hexadecimal codes are generally six digits, with each of the three pairs of digits representing each of the three color channels. You can specify the hexadecimal value with or without the preceding # symbol. You can also enter hexadecimal shorthand notation, which is used when digit pairs are identical. For example, #09C is equivalent to #0099CC.
Color transparency
Colors can be partially or wholly transparent. A transparency of 100 percent means a color is fully transparent, or effectively invisible. A quick way to set a color to 100 percent transparent is to click No Color directly on the color palette instead of opening the Color Editor dialog box. (Note that there are still values assigned to the other color channels when you do this.) When colors are 0 percent transparent, they are completely opaque.
Save colors in a style
To save a color for reuse, click Color Properties in the color palette, and on the Color Editor dialog box, click Save color to style. Type a name and, optionally, a category and tags. Then choose where to save the style. You may have only one choice, to save the color to your Favorites style. Once saved, the color becomes available in color palettes across all of your ArcGIS Pro projects. If you have other editable styles in your project, you can also add the color to those.
To learn more about adding styles to a project, see Add styles to a project.