Summary
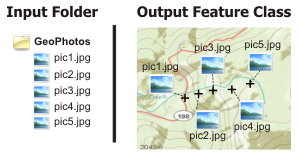
Creates points from the x-, y-, and z-coordinates stored in geotagged photos. Optionally adds photo files to features in the output feature class as geodatabase attachments.
Illustration

Usage
This tool reads the longitude, latitude, and altitude coordinates from photo files and writes these coordinates and associated attributes to an output point feature class.
The output feature class will have the following attribute fields:
- Path—The full path to the photo file used to generate the point, for example, C:\data\photos\Pic0001.jpg.
- Name—The short name of the photo file, for example, Pic0001.jpg.
- DateTime—The original capture date and time of the photo file. When the output feature class is a shapefile, this field will be of type string. When the output feature class is in a geodatabase, this field will of type date.
If the DateTime field contains null or blank values, it may be an indication that your device did not capture a useable timestamp with the photo. Photo files may have a date created or date modified property, but these often do not represent the date and time the photo was captured.
- Direction—The direction the device was pointing when the photo was captured. Values range from 0 to 359.99, where 0 indicates north, 90 indicates east, and so on. If no direction is recorded by the device, this field will have a value of Null, 0, or -999999, depending on the device and the output location you specified. The direction value may refer to degrees from true north or magnetic north. Refer to device documentation for more information.
Note:
Use a geotagged photo's direction information with caution, as the direction recorded by the device may not be accurate. Refer to device documentation for information on directional accuracy.
- X—The x-coordinate where the photo was captured.
- Y—The y-coordinate where the photo was captured.
- Z—The altitude in meters where the photo was captured. If an altitude was not recorded by the device, the field will have a value of Null, 0, or -999999, depending on the device and the output location you specified.
The output DateTime can be used to analyze and map the output feature class through time.
The tool output includes a line chart showing the timeline of photos, using a count of the time stamps in the DateTime field in date and time bins that are automatically calculated but can be customized.
If the x- and y-coordinates of a photo are 0,0, no point will be generated for that photo. Empty coordinates often occur because the device does not have an adequate signal to capture coordinates. If the Include Non-GeoTagged Photos parameter is checked (ALL_PHOTOS in Python), the photo will be added as an output feature with null geometry.
The output feature class will have a GCS_WGS_1984 XY and vertical coordinate system, since that is the coordinate system used by GPS receivers.
Syntax
arcpy.management.GeoTaggedPhotosToPoints(Input_Folder, Output_Feature_Class, {Invalid_Photos_Table}, {Include_Non-GeoTagged_Photos}, {Add_Photos_As_Attachments})| Parameter | Explanation | Data Type |
Input_Folder | The folder where photo files are located. This folder is scanned recursively for photo files; any photos in the base level of the folder, as well as in any subfolders, will be added to the output. | Folder |
Output_Feature_Class | The output point feature class. | Feature Class |
Invalid_Photos_Table (Optional) | The optional output table that will list any photo files in the input folder with invalid Exif metadata or empty or invalid coordinates. If no path is specified, this table will not be created. | Table |
Include_Non-GeoTagged_Photos (Optional) | Specifies if all photo files will be included in the output feature class or only those with valid coordinates.
| Boolean |
Add_Photos_As_Attachments (Optional) | Specifies if the input photos will be added to the output features as geodatabase attachments. License:Adding attachments requires an ArcGIS Desktop Standard or higher license, and the output feature class must be in a version 10 or higher geodatabase.
| Boolean |
Code sample
The following Python window snippet demonstrates how to use the GeoTaggedPhotosToPoints tool.
import arcpy
arcpy.GeoTaggedPhotosToPoints_management("c:/data/photos",
                                         "c:/data/city.gdb/photo_points", "",
"ONLY_GEOTAGGED", "ADD_ATTACHMENTS")The following script demonstrates how to use the GeoTaggedPhotosToPoints tool.
"""Name: GeoTaggedPhotosToPoints example
Description: Convert a folder of photos to points, then perform a buffer
"""

# Import system modules
import arcpy

# Set environment settings
arcpy.env.workspace = "C:/data"

# Set local variables
inFolder = "photos"
outFeatures = "city.gdb/photos_points"
badPhotosList = "city.gdb/photos_noGPS"
photoOption = "ONLY_GEOTAGGED"
attachmentsOption = "ADD_ATTACHMENTS"

buffers = "city.gdb/photos_points_buffer"
bufferDist = "1 Miles"

arcpy.GeoTaggedPhotosToPoints_management(inFolder, outFeatures, badPhotosList,
                                         photoOption, attachmentsOption)
arcpy.Buffer_analaysis(outFeatures, buffers, bufferDist)
Environments
Licensing information
- Basic: Limited
- Standard: Yes
- Advanced: Yes