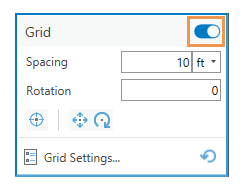
The reference Grid  for editing is a drawing aid comprising horizontal and vertical grid lines equally spaced on an XY plane. If snapping is turned on, the pointer snaps to grid line edges and intersections. The grid is turned on or off on the status bar at the bottom of the active map.
When you use the grid, consider the following:
- Grid origin, spacing, and rotation is customizable and independent of the spatial reference assigned to the active map or scene, or source data.
- If the active view is a local scene, additional horizontal and vertical XY grids can be turned on or off.
Turn the grid on
To turn the grid on, complete the following steps:
- On the status bar at the bottom of the active map or scene, click the Grid button
 .
.
Alternatively, hover over the button until the pop-up menu appears and click the Grid toggle button.

- If the active view is a scene, check one or more of the following 3D grid options to show them in the scene:
Horizontal

Show the horizontal grid.
Vertical Left

Show the vertical grid on the left side of the scene.
Vertical Right

Show the vertical grid on the right side of the scene.
Change grid spacing
To change the spacing between grid lines, complete the following steps:
- On the status bar at the bottom of the active map or scene, hover over the Grid button
 until the pop-up menu appears.
 - Click the Spacing text box, type the distance, and choose the units.
Grid spacing is specified as one value for both the x- and y-distance between grid lines.
- Move the pointer back to the map.
Change the origin and rotation
To change the origin and rotation of the grid, complete the following steps:
- On the ribbon, click the Edit tab. In the Snapping group, enable the snapping agents you want to use to set the origin.
- On the status bar at the bottom of the active map or scene, hover over the Grid button
 until the pop-up menu appears.
 - Click the Set Origin and Rotation tool
 .
. The grid toolbar appears at the bottom of the map or scene.

- Move the pointer and click the map to set the origin location. The pointer uses your current snapping settings.
In 3D scenes, this also sets the elevation.
- Move the pointer and click the map to set the rotation angle.
Change only the origin
To change the origin of the grid and preserve its current rotation, complete the following steps:
- On the ribbon, click the Edit tab. In the Snapping group, enable the snapping agents you want to use to set the origin.
- On the status bar at the bottom of the active map or scene, hover over the Grid button
 until the pop-up menu appears.
 - Click the Set Origin tool
 .
. The grid toolbar appears at the bottom of the map or scene.

- Move the pointer and click the map to set the origin location. The pointer uses your current snapping settings.
In 3D scenes, this also sets the elevation.
Change only the rotation
To change the rotation of the grid and preserve its origin, complete the following steps:
- On the ribbon, click the Edit tab. In the Snapping group, enable the snapping agents you want to use to set the origin.
- On the status bar at the bottom of the active map or scene, hover over the Grid button
 until the pop-up menu appears.
 - Click the Rotation text box and type the rotation angle.
- Move the pointer back to the map.
- To specify the angle with the pointer, click the Rotate tool
 .
.The grid toolbar appears at the bottom of the map or scene.

- Move the pointer to rotate the grid, and click the map to save the rotation angle.
Change only the elevation
To change the elevation of the grid in a 3D local scene and preserve its current origin and rotation, complete the following steps:
- On the status bar at the bottom of the active map or scene, hover over the Grid button
 until the pop-up menu appears.
 - Click the Elevation text box, and type the distance and choose the units.
- Move the pointer back to the map.