Faces
You can change the appearance of a 3D scene by applying effects to the faces of objects.
Face culling
Modifying the layer face culling property allows you to see through the front, back, or both faces of 3D objects, depending on which side of the objects you are viewing. The command is enabled for layers containing area-based data, including extruded polygons, multipatches, TIN triangles, and raster data.
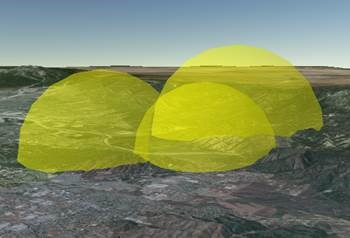 | 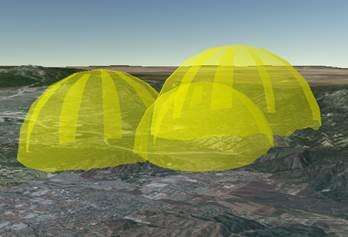 |
Face culling hides the back of an object. | Face culling is applied on both sides. |
You can set the face culling mode of layers by selecting them in the Contents pane and navigating to the Faces group on the layer's contextual tab.
Click the Face Culling drop-down menu and choose the option you want to use. Culling has the following options:
- None
 —Turns off culling so you view both sides. This is the default.
 - Back
 —Turns on back-face culling, eliminating those objects from view that face away from you.
 - Front
 —Turns on front-face culling, eliminating those objects from view that face you. Use this option to see through the front of an object.
 - Built-In
 —Turns on the feature's built-in face culling.
Lighting
By default, the built-in geometry properties of a 3D object are used to shade it for the scene's current light position. The properties used for lighting are 3D vectors—or normals—that define the direction that each face will reflect light. The shading of each face of the 3D object is calculated from its normal.
Normals are usually perpendicular to the geometry but can also be defined in other directions, particularly to soften hard seamlines in the geometry. It is these properties that help show 3D objects with a natural, three-dimensional appearance. When the normals for a 3D object are missing or have been defined incorrectly, parts of the model may draw darker or lighter than expected, and embedded textures can display on the wrong side of a face.
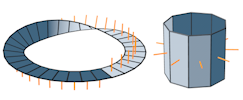
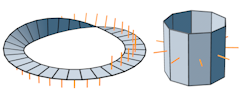
If you experience display anomalies with your 3D object data, you can try changing the layer's lighting properties to improve the appearance. These options are only available for layers whose data source is a multipatch feature class or point feature classes in scenes using 3D models as symbols.
You can set the lighting mode for a layer by selecting it in the Contents pane and navigating to the Faces group of the layer's contextual tab.
Click the Lighting drop-down menu and choose from the following options:
 One-Sided Lighting Using Data Normals—Lighting affects one side of each face of a 3D object, using the built-in information about the direction of each face. Properly authored 3D object data will display correctly using this option. This is the default in ArcGIS Pro.
  One-Sided Lighting Using Reset Normals—Lighting affects one side of each face of a 3D object. The information about the direction of each face is recalculated based on the geometry. This option is useful for cases in which the normals included in the 3D object are incorrect, but there are no duplicate or coincident faces.
 Two-Sided Lighting Using Data Normals—Lighting affects both sides of each face of a 3D object, and the built-in information about the direction of each face is used for both sides. This option is useful for cases in which the data normals are correct, but there are duplicate or coincident faces. However, this option may result in a dark shadow across the face if the normals are not perpendicular to the face.
  Two-Sided Lighting Using Reset Normals—Lighting affects both sides of each face of a 3D object, and the information about the direction of each face is recalculated based on the geometry. This option is best for data with normals that are not properly authored and with duplicate or coincident faces.
 Two-Sided Lighting from Winding Order Using Data Normals—Lighting affects both sides of each face of a 3D object, using the order in which the vertices are defined to determine which direction each side is facing, and the source normals are used to compute lighting for each face. This option is useful for data in which the normals are authored correctly, but not perpendicular to each face, and the winding order is consistent across all faces.
 Two-Sided Lighting from Winding Order Using Reset Normals—Lighting affects both sides of each face of a 3D object, using the order in which the vertices are defined to determine which direction each side is facing, and using normals that are recalculated based on the geometry. This option is useful for data in which the normals are not correct, but winding order is consistent across all faces.
Lighting and Shading
Lighting and Shading enhances the perception of depth and 3D geometry, yielding a more accurate display of the layer's 3D elements. The effect is reproduced by simulating the casting of light and resulting shadows from the scene's view angle.
Enable Lighting
This setting enables lighting for the layer. By default, scenes apply a single light source to all layers in the scene. In some cases, the texture of an object already contains highlights and shadows from real or prerendered lighting. In this case, you can turn off the scene lighting for the layer so that the lighting information in the texture is used.
Eye Dome Lighting
Eye-dome lighting is a shading technique that improves the perception of depth and contour when viewing LAS datasets and point cloud scene layers. Each point is shaded by a halo whose intensity depends on the proximity of its surrounding objects, making points that are clustered together more discernible from empty regions and other 3D elements in the background.
Eye-dome lighting is enabled by default when LAS datasets and point cloud scene layers are added to a scene.
Eye-dome lighting is available from the illumination options from the properties of a global or local scene. If turned off in the scene properties, eye-dome lighting is unavailable for the layers in the scene. Using the illumination properties can improve drawing performance.
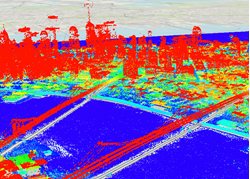 | 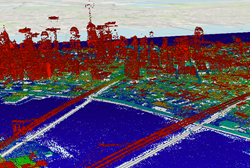 |
A global scene is shown with no eye-dome lighting. | A global scene is shown with eye-dome lighting. |
You can set the following properties for eye-dome lighting on the layer from the layer's contextual tab:
Radius
The distance in pixels to apply the halo shading effect. The values range from 1 to 5.
Strength
The intensity of the shading effect, expressed in percentages. A value of 100 percent describes the most intense shadow.