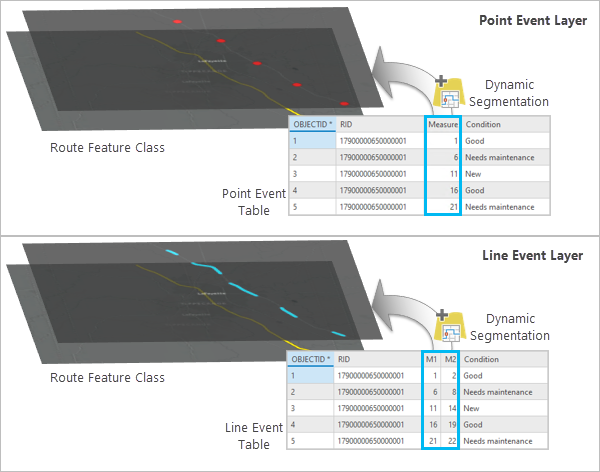
Events along a route are modeled as points or lines and visualized through a process known as dynamic segmentation. This process allows multiple sets of attributes to be associated with any portion of a linear feature instead of having to split the linear feature each time an attribute value changes.
Route events and route event tables
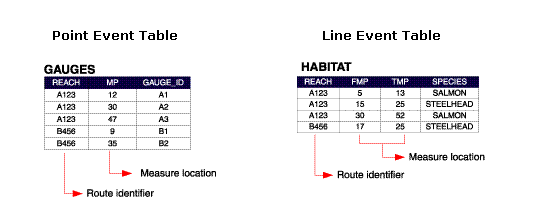
Event tables contain information about assets, conditions, and events that can be located along route features. Each row in the event table references an event, and its location is expressed as measurements along named (identifiable) linear features.
There are two types of route events:
- Point events—A point event is stored in a point event table and describes a discrete location along a route (a point) and uses only a single measure value to describe the discrete location—such as Mile 3.2 on I-91.
- Line events—A line event is stored in a line event table and describes a portion of a route (a line) and uses both from and to measure values to describe the portion of a route—for example, Mile 2 to Mile 4 on I-91.
All event tables must contain a route identifier and measure location fields containing measure information. A point event table uses a single measure field to describe its discrete location. A line event table requires two measure fields (from and to measure values) to describe their location.
Route locations and their associated attributes are typically stored in an event table based on a common theme. For example, four event tables containing information on speed limits, year of resurfacing, present condition, and accidents can be included and used to dynamically locate events on one route feature class.
An event table can be any tabular data source that ArcGIS Pro supports. This includes geodatabase tables, delimited text files, dBASE, and database management system tables accessed through an Object Linking and Embedding database (OLE DB) connection.

Create and edit route events and route event tables
The process of creating and editing route events and route event tables is the same as creating and editing standard records and tables in ArcGIS Pro. To create a table, follow the create dataset process. In addition to creating tables from scratch, the linear referencing geoprocessing tools such as Locate Features Along Routes also create a route event table as output.
Display events on a map
Events are visualized on the map through dynamic segmentation. Dynamic segmentation is the process of computing the map location (shape) of events stored in an event table. Dynamic segmentation allows multiple sets of attributes to be associated with any portion of a linear feature. To display route events on a map, however, you must first define the parameters of the relationship between the table storing the events and the routes that the events reference. The result of the dynamic segmentation process is a dynamic feature class known as a route event source. A route event source can serve as the data source of a feature layer in ArcGIS Pro.
For the most part, a dynamic feature layer behaves like any other feature layer. You can decide whether to display it, specify the scale at which it is visible, specify the features or subset of features to display, determine how to draw the features, decide whether to store it as a layer file (.lyr), decide whether to export it, and so on. A route event source can be edited in ArcGIS Pro. It is important to note that you can only edit the attributes. The shapes of a route event source cannot be edited because they are generated by the dynamic segmentation process. When you edit a route event, you are editing the underlying event table. There may be some editing limitations imposed by the event table. For example, you cannot directly edit the attributes of a route event source created from a delimited text file table, because ArcGIS Pro does not support editing text files directly.
Learn more about dynamic segmentation

Display route events
Route event source layers are generated using the Make Route Event Layer geoprocessing tool. You can open the tool in the following ways:
- From the Geoprocessing pane under the Linear Referencing toolbox
- From the contextual Linear Referencing tab
- By clicking Display Route Events from a table in the Contents pane
- Open the Make Route Event Layer geoprocessing tool using one of the following methods:
- On the ribbon, click the Analysis tab and click the Tools button in the Geoprocessing group. In the geoprocessing pane, browse to the Linear Referencing toolbox and click Make Route Event Layer.
- On the Linear Referencing tab, click the bottom half of the Tools button. From the drop-down menu, click Make Route Event Layer.
- In the contents pane, right-click an event table and click Display Route Events.
Note:
The Make Route Event Layer tool opens in the geoprocessing pane. Some of its parameters are blank; others have default values. Required parameters are marked with a red asterisk. - Click the Input Route Features drop-down arrow and click the route reference layer.
Note:
Alternatively, click the Browse button and browse to the route reference feature class.
 - Click the Route Identifier Field drop-down menu and click the route identifier field.
- Click the Input Event Table drop-down arrow and click the event table.
Note:
Alternatively, click the Browse button and browse to the event table.
 - Under Event Table Properties, click the Route Identifier Field drop-down arrow and click the route identifier field.
- Choose an Event Type and corresponding measure:
- For a Point event, one measure field displays.
- For a Line event, two measure fields display (From-Measure Field and To-Measure Field).
- Type a layer name for the layer.
- Optionally, set Generate a field for locating errors, Generate an angle field, Events with a positive offset will be placed to the right of the routes, and Point events will be generated as multipoint features.
These advanced options are described below.
Note:
The Generate an angle field and Point events will be generated as multipoint features options are only available for point events.
Advanced dynamic segmentation options
When generating a route event source, additional options are available. The options available depend on whether you are visualizing point events or line events.
Point events as multipoint features
When a point event is located along a route, a point feature is created. In some applications, however, route measures are not unique. For these applications, you can treat point events as multipoint features.

Event locating angles
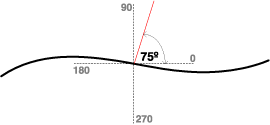
When a point event is located along a route, you may want to know the angle of the route where the event is placed. For example, you may need to rotate the marker symbol that is used to display the event, so it is oriented to the route and not the map, and you may need to rotate a point event's label.
The dynamic segmentation process can calculate either the normal (perpendicular) or tangent angle. You can also calculate the complement of these angles so that you can, for example, control the side of the route on which a rotated label appears.

Event locating errors
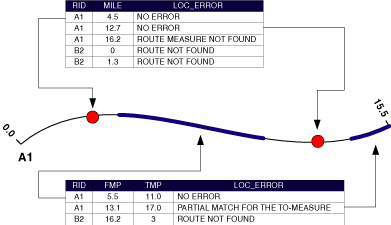
The dynamic segmentation process creates a shape for each row in the input route event table. In some cases, however, the shape of the event feature may be empty. This occurs when the event can't be properly located. In other cases, an event can only be partially located; this occurs only with line events.
The dynamic segmentation process can expose locating errors—if any exist—for each event in an event table as a field. This field is useful when performing quality assurance tests on event tables.
