Available with Location Referencing license.
The Dynamic Segmentation tool creates an output where the events on a route are dynamically segmented together into one record set. The tool returns separate records at any measure along the event where any of the attributes change.
Dynamic segmentation scenario
In the following diagram, two line event layers—TestPressureRange and DOT Class—are associated with a single route—Route1. Each event layer has different values along the route measures indicated by the color changes.
The route is calibrated from left to right between measures 0 and 10. The two events are present on the route and have the input and output properties described in the subsections below.
Input
The following table shows the first event's measures and values:
Input (TestPressureRange)
| Route ID | Event ID | From Measure | To Measure | From Date | To Date | Test Medium |
|---|---|---|---|---|---|---|
Route1 | Event1 | 0 | 3 | 1/1/2000 | <Null> | Water |
Route1 | Event2 | 3 | 9 | 1/1/2000 | <Null> | Air |
The following table shows the second event's measures and values:
Input (DOT Class)
| Route ID | Event ID | From Measure | To Measure | From Date | To Date | DOT Class |
|---|---|---|---|---|---|---|
Route1 | Event1 | 0 | 5 | 1/1/2000 | <Null> | Class1 |
Route1 | Event2 | 5 | 8 | 1/1/2000 | <Null> | Class2 |
Output
The output feature class and accompanying attribute table are dynamically created using data from constituent linear events. The attribute table is editable, and the edits go through to the individual event layers.
Moving in the direction of calibration of the route (for example, from left to right), the first segment in the events is caused by the TestPressureRange value, Water, which starts at measure 0 and ends at measure 3. The second segment is caused by the DOT Class value, Class 1, which ends at measure 5. The third segment is caused by the DOT Class value, Class 2, which ends at measure 8. The fourth segment between measures 8 and 9 contains only the TestPressureRange value, Air. The final segment between measures 9 and 10 contains no events.
The following table shows the dynamic segmentation output.
Output (Dynamic Segmentation)
Route ID | Section | From Measure | To Measure | From Date | To Date | Water | DOT Class |
Route1 | 1 | 0 | 3 | 1/1/2000 | <Null> | Water | Class 1 |
Route1 | 2 | 3 | 5 | 1/1/2000 | <Null> | Air | Class 1 |
Route1 | 3 | 5 | 8 | 1/1/2000 | <Null> | Air | Class 2 |
Route1 | 4 | 8 | 9 | 1/1/2000 | <Null> | Air | |
Route1 | 5 | 9 | 10 | 1/1/2000 | <Null> |
The dynamic segmentation can have multiple use cases depending on the needs of an organization and can provide the basis of analysis to evaluate regulatory, policy, and budget options. The following are examples:
- Analyze pipeline conditions using other variables to determine the allocation of funds for maintenance.
- Provide a cross event check to ensure data accuracy along a route.
- Check for gaps in the data and fill them.
Note:
This tool is similar to the Overlay Events tool. The difference between the Dynamic Segmentation tool and the Overlay Events tool is that the Dynamic Segmentation tool can be used to edit the event data in an ArcGIS Pro edit session. The Overlay Events tool outputs a feature class or table that represents the dynamic segmentation of the inputs, but the output is not connected to the input events for editing.
Return a dynamic segmentation output
Complete the following steps to return a dynamic segmentation output:
- Open the map in ArcGIS Pro and zoom to the location where you want to apply dynamic segmentation.
Note:
You need the network and line event feature classes to run this tool.
- Optionally, zoom to the routes on the map where you want to apply dynamic segmentation.
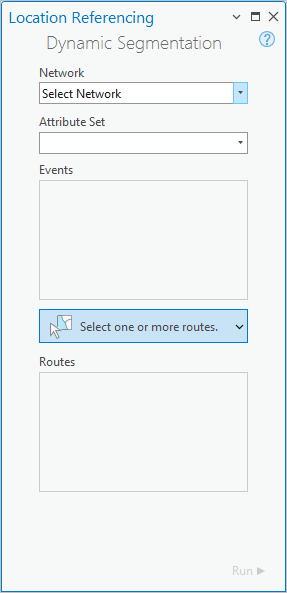
- On the Location Referencing tab, in the Events group, click DynSeg
 .
.The Dynamic Segmentation pane appears.

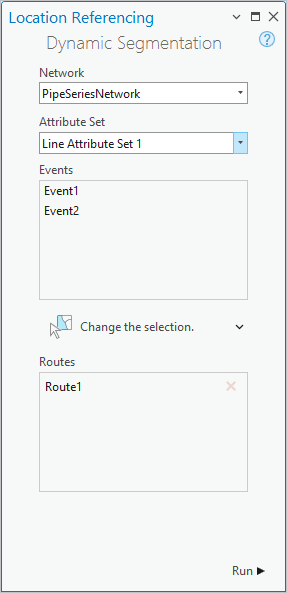
- Click the Network drop-down arrow and choose the network where you want to apply dynamic segmentation.
The line event attribute sets configured with the chosen network are listed in the Attribute Set list.
- Click the Attribute Set drop-down arrow and choose an attribute set.
The events in the chosen attribute set are used for dynamic segmentation.
- Click Select one or more routes to select the route or routes on the map with the events you want to segment.
You can use any of the provided geometric selection tools to populate the Routes list.
If routes are already selected when the network is chosen, they're added to the Routes list.

- Click Run to apply dynamic segmentation on the selection set.
An output feature class, Dynamic Segmentation, is created and added to the Contents pane.
Edit records in the output feature class
You can edit the events in the Dynamic Segmentation output feature class in the same way you edit events in an event layer's attribute table. Dynamic segmentation edits can be performed to correct errors, reflect changes to measures on an associated route, or to update the value of unique event attributes.
Complete the following steps to edit events in the Dynamic Segmentation output feature class after running the Dynamic Segmentation tool  .
.
- Right-click the Dynamic Segmentation output feature class in the Contents pane and click Attribute Table.
The attribute table appears.
- Double-click a cell in the table to allow its value to be edited and provide the changed value.
Note:
The following fields cannot be edited: Object ID, Route ID, From Measure, To Measure, From Date, and To Date.
If you are using a tool such as Calculate Field to edit the table, the Save Edits button is enabled once the Enable Undo option is enabled in the tool, or you have edited feature before using the tool.
If a message appears that is related to acquiring locks, the need to reconcile, or not being able to acquire locks, and so on, conflict prevention is enabled.
- On the Edit tab, click Save Edits to save the changes.
The edits you make in the Dynamic Segmentation table are saved in each of the individual event layers.