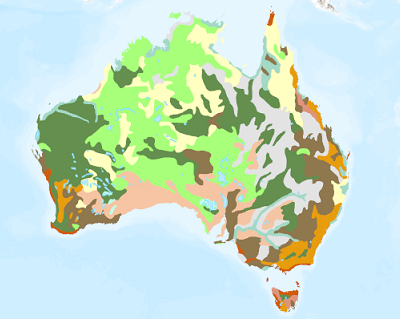
Unique values symbolize qualitative categories of values. Examples include habitat types, planning zones, voting preferences, and soil classifications.
Unique value symbology can be based on one or more attribute fields in the dataset, or you can write an Arcade expression to generate values on which to symbolize.
If you have access to a style that has symbols named to match the symbol class values, you can use the Match Layer Symbology To A Style geoprocessing tool to apply unique values symbology to the layer.

The Primary symbology tab  has two subtabs to establish unique values symbology:
- The Classes tab is where you manage the symbol, its patch shape, the values, the descriptive labels, and grouping of the symbol classes.
- The Scales tab is where you specify the scale ranges in which each symbol class draws.
To symbolize using unique values, complete the following steps:
- Select a feature layer in the Contents pane. On the Feature Layer tab, in the Drawing group, click Symbology
 and click Unique Values to open the Symbology pane.
 - In the Symbology pane, on the Primary symbology tab
 , on the Field 1 menu, choose a field on which to symbolize.
 - Optionally, click the expression button
 to open the Expression Builder dialog box. Write an expression and click Verify
  to validate it.
 - Optionally, click Add Field to add symbol permutations.
You can have up to three symbology fields. Only the first field can use an expression.
- Optionally, on the Classes tab of the Symbology pane, click Add all values
 to add additional symbol classes.
 When choosing a field for unique values for the first time, no values are added.
- Choose a color scheme from the Color scheme drop-down list.
Depending on the number of unique values, the color schemes from project styles are filtered so that only relevant color schemes are presented to you. For example, if you have only five unique values, you see quantitative color schemes showing five colors. In addition, you can also choose from random color schemes. Check the Show all check box to see all available color schemes. Color schemes stored in your Favorites style or custom styles appear in this list, regardless of their type or number of colors. Click Format color scheme to modify a scheme.
Note:
The colors in the color scheme are applied to all symbol classes by default. To apply the color scheme to a subset of symbol classes only, select those classes by highlighting them in the table on the Classes tab inside the Symbology pane. (Press and hold Shift or Ctrl while clicking in the Value or Label columns to select symbol classes.) With symbol class rows selected, choose a color scheme from the Color scheme drop-down list at the top of the Symbology pane.
Click the Clear Selection button
 to deselect symbol classes if necessary.
Set the color scheme target
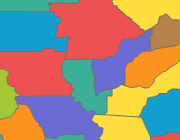
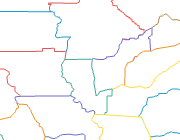
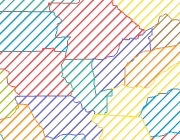
If you are symbolizing polygons, click the Color scheme options button  to choose the target for the color scheme. You can apply the colors to the polygon fills, outlines, or both.
When you change the color scheme target, the other symbol layers of the polygons symbolizing each symbol class are not updated. For example, when you set the color scheme target to Apply to outline, the fill symbol layers are not updated, and setting it to Apply to fill does not alter the outlines of the polygons. This is to ensure that customized symbology is not lost. Symbol layers that are color locked are not updated by changes to the color scheme, regardless of the color scheme target setting.
To update all symbol layers to match the color scheme target setting, click the More drop-down menu and click Regenerate all symbols.
| Color scheme target | Result | Result after regenerating symbols |
|---|---|---|
| Apply to fill | The color scheme is applied to the fills (fill symbol layers) of the polygon symbols. | The color scheme is applied to the fills of the polygon symbols. Polygon outlines (stroke symbol layers) are solid gray lines. |
| Apply to outline | The color scheme is applied to the outlines (stroke symbol layers) of the polygon symbols. | The color scheme is applied to the outlines of the polygons. Polygon fills are fully transparent. |
| Apply to fill and outline | The color scheme is applied to the fills and outlines (fill symbol layers and stroke symbol layers) of the polygon symbols. | The color scheme is applied to the outlines of the polygons. The color scheme is applied to the fills of the polygons as hatches. |
Modify unique values symbology
You make most changes to unique value symbology from the Primary symbology tab of the Symbology pane  . This tab includes the Classes and Scales subtabs, its subtab tools, the More menu, and an interactive table that shows unique values with their corresponding symbols and headings.
To organize unique value symbology, you can use the following tools:
- Click Add unlisted values
 to open a table in the Select values to add subpane and add symbol classes. This table lists all values not currently symbolized. Click Options and click Add new value
  to type a new value. When you add new values, they are added with the symbol of the <all other values> symbol class.
 Tip:
If you are working with complex symbols, you can use this as a way to symbolize many symbol classes at once with a symbol and make changes to each class as necessary.
- Drag a symbol class row to a new position in the table or click Move selected values up
 or Move selected values down
  to change the order of the symbol classes.
 - On the Scales tab, you can add alternate symbols to further refine the appearance of features within certain scale ranges.
- To set masking per feature, click the Advanced symbology options tab
 and expand Feature level masking.
- Click a symbol in the Symbol column of the table to open the Format Symbol pane and modify the symbol or choose a different symbol.
- For line and polygon features, click the drop-down arrow next to the symbol to set the symbol's legend patch. To change multiple patches at the same time, hold Shift or Ctrl while clicking the symbols, right-click the selection, and select Update legend patch to choose the patch shape.
- Right-click the Value or Label heading and click Sort Ascending
 or Sort Descending
  to sort values. The symbol class order is reflected in the Contents pane and also in legends on layouts.
 - Click the label in the Label column and type a new label. Click another column or press Enter to apply the label.
- Right-click a symbol class and click Remove
 to remove the symbol class. No data is deleted, but the associated features do not draw. Note that they may still be symbolized by an All other values group at the bottom of the table that collectively draws all values that are not otherwise symbolized by a symbol class.
 - Right-click the All other values symbol class and click Remove
 , or click More and uncheck Show all other values so that only features participating in symbol classes are drawn. If the symbol class is removed from the legend, the total feature count for all other values is listed at the bottom of the pane.
- Click Show count to show the total feature count of each symbol class. To update the count, click the More drop-down again and choose Refresh count.
- Click Show description to add the Description column to the unique values table. You can double-click a description cell to edit or update the description in the pop-up dialog box. Click Update to apply the description. The description appears with its symbol class in layout legends.
- Click Reverse symbol order to reverse the size of the symbols in your feature layer.
- Click Format all symbols to make changes to all symbols. To change the basic properties of more than one symbol at a time, press Shift or Ctrl while clicking the symbols to make a selection. Right-click the selection, and choose Format symbols.
- Click Regenerate all symbols to reset each symbol class to its default symbol based on current symbology parameters. You may want to do this after you've changed the color scheme target or to discard individual symbol edits and get back to a default state.
- Click Remove all to remove all symbol class values from the symbology.
Organize symbol classes into groups and headings
When there are a lot of symbol classes in a layer, it may help to group values together and to arrange symbol classes under headings.
Use grouping to make a combined symbol class from more than one unique value. For example, a roads layer may have the following road type values with five corresponding symbol classes:
| Road type value | Symbol class label |
|---|---|
1 | Divided highways |
2 | Highways |
3 | Major roads |
5 | Minor roads |
7 | Streets |
| Road type value | Symbol class label |
|---|---|
1, 2 | Highways |
3 | Major roads |
5,7 | Roads |
Group values
To group values together into one symbol class, follow these steps:
- While pressing the Ctrl key, click multiple symbol class rows from the table to select them.
- Right-click the Value or Label cell of one of the selected values and click Group values
 to combine selected classes into one group.
 .
.Create headings
Use headings to organize similar symbol classes together in the legend and give them a collective name. Headings are reflected in the Contents pane and also in legends on layouts. Follow these steps to create headings for symbol classes:
- Click a symbol class row to select it, or while pressing the Ctrl key, click multiple symbol class rows to select them.
- Right-click the Value or Label cell of one of the selected values and click Move to heading
 .
.- Click New heading to place the selected symbol classes under a new heading. Rename the heading as necessary.
- Click the name of the existing heading (Heading by default) to place the selected symbol classes under the existing heading.
- Optionally, reorder headings. Click the Heading options button
 next to the heading name and click Move heading and classes up
  or Move heading and classes down
  .
. The symbol classes within the heading stay with the heading and are also moved.
- To remove a heading from the layer, click the Heading options button
 next to the heading name and click Remove heading and classes
  .
. The symbol classes within the heading are also removed. Click Add unlisted values
 to add them back, if necessary.
Vary unique value symbology by transparency, rotation, size, or color
In addition to specifying qualitative symbology with unique values, you can also symbolize additional attributes by varying the transparency, rotation, size, and color of the unique value symbols. While all of these visual variables can be applied simultaneously, be aware that too many variations make the layer difficult to interpret. It is recommended that you apply secondary symbology sparingly.
Learn more about symbolization concepts
- In the Symbology pane, click the Vary symbology by attribute tab
 .
. - Expand Transparency, Rotation, Color, or Size.
With polygon features, Outline width replaces Size, and Rotation is not available.
If a visual variable is set on the primary symbology, a sample size used to calculate statistics for the variable is set to 10,000 records. To change the maximum sample size, on the Advanced symbology options tab  , expand Sample size and modify the maximum sample size value.


