Available with Spatial Analyst license.
Available with Image Analyst license.
When building expressions in the Raster Calculator tool, clicking and double-clicking the various layers, variables, buttons, and tool names on the dialog box will help you to avoid syntax errors that may otherwise be made while typing.
Since the expression entered in the Raster Calculator tool will be run in Python, and Python is case sensitive, it is important to use the correct capitalization of the tool name. For example, to use the IsNull tool, type it as IsNull, instead of Isnull or isnull.
When multiple Relational or Boolean operators are used in a sequence, the expression requires parentheses. For more information, refer to the usage tips listed in the Raster Calculator tool help.
Example expressions for the Raster Calculator tool
While map algebra is used both in the Raster Calculator tool and directly in Python, the following are differences in the syntax that you should be aware of:
- Since there is a specific output parameter on the Raster Calculator tool dialog box, map algebra expressions do not include an output name and an equals sign (=) when using the Raster Calculator tool.
- Only on the Raster Calculator tool dialog box can layer names be used directly with operators. When working in Python itself, layers must first be cast as Raster objects.
- Similarly, only on the tool dialog box can Raster Calculator variables be contained within percent signs (%) or quotation marks (").
Raster Calculator tool dialog box examples
Following are several examples of map algebra expressions that can be run in the Raster Calculator tool. In these expressions, the raster layer names are contained within quotes, for example, "dist".
- ("pop" > 150) & ("dist" > 10)
- ("Band4" - "Band3") / Float("Band4" + "Band3")
- Con("elev" <= 3000, 1, 0)
- Con(IsNull("elev"),0, "elev")
- Con(("landuse1" == 1) & ("landuse2" == 5), "landuse1" + "landuse2", 99)
- Con(Raster('elev') != 0,'elev')
- (Con('elev', 'elev', "", "elev_feet <> 0")) + Raster("tree_height")
- Con("inRas" < 45,1, Con(("inRas" >= 45) & ("inRas" < 47),2, Con(("inRas" >= 47)&("inRas" < 49),3, Con("inRas" >= 49,4))))
An example Raster Calculator expression in ModelBuilder
When using the Raster Calculator tool in ModelBuilder, the only difference is that variables can be used as input as well as layers. For more information regarding the syntax, what types of variables can be used, and the connectivity behavior of the Raster Calculator tool in ModelBuilder, see the Raster Calculator tool help.
How variables and layers appear in the expression
The example below shows the map algebra expression syntax of a Raster Calculator tool being used in a model.
Note:
In the example, several of the layers were created by the Reclassify tool, which requires that either a Spatial Analyst or a 3D Analyst extension license be available. The Raster Calculator tool portion of the model can be performed with either a Spatial Analyst or an Image Analyst extension license.
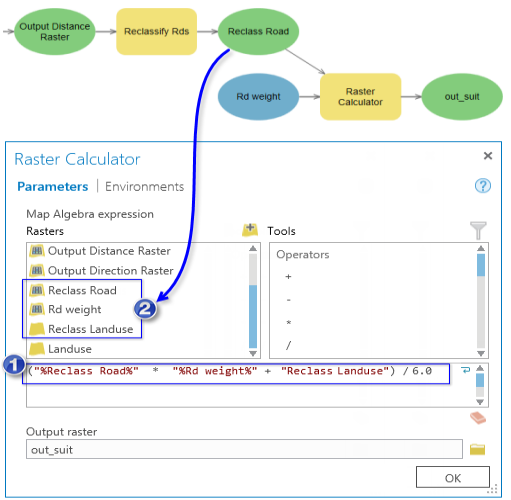
In this example, Raster Dataset Variable, a Long Variable, and a Raster Layer are being used.
Notice that the different variables have slightly different syntax:
Variable or layer name Variable type How syntax first appears in the expression Reclass Road
Raster Dataset Variable "%Reclass Road%" Rd weight
Long Variable %Rd weight% Reclass Landuse
Raster Layer "Reclass Landuse" To have inputs added with the correct syntax, complete the following steps:
- Place the pointer at the appropriate location in the expression box.
- Double-click the appropriate layer.

The Raster Calculator tool with a simple expression using variables and layers is shown. After clicking OK to close the Raster Calculator tool dialog box, a variable representing the Reclass Landuse layer will be added to your model as a model variable.
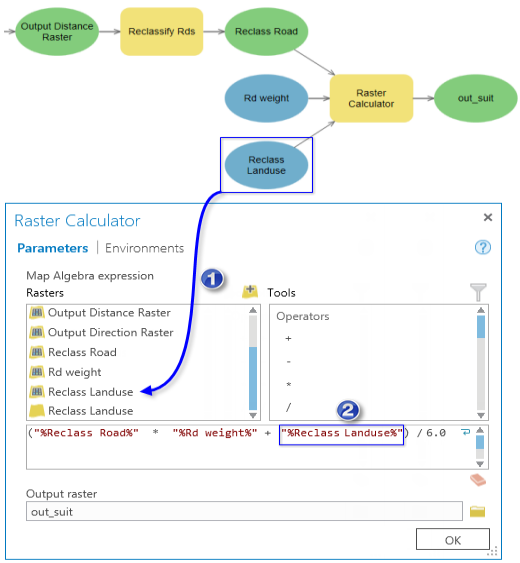
When the Raster Calculator tool dialog box is reopened, be aware of the following:
- The Reclass Landuse variable is added to the list.
- The syntax in the expression has been updated from the layer syntax ("Reclass Landuse") to the variable syntax ("%Reclass Landuse%").

An example of the Raster Calculator tool with an expression using variable syntax is shown.