Available with Standard or Advanced license.
Available for an ArcGIS organization with the ArcGIS Reality license.
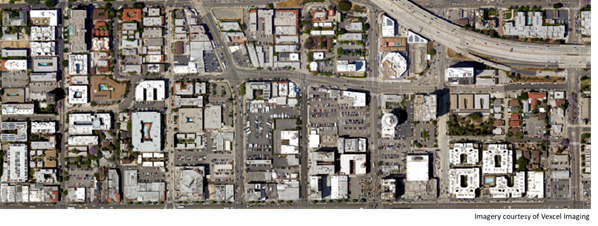
A True Ortho is an orthorectified image corrected using a DSM, which removes perspective distortion. There is no displacement caused by relief or tall structures, resulting in no building lean obscuring ground features and allowing building footprints to be correctly identified. You can create True Orthos in ArcGIS Reality for ArcGIS Pro.
Once you create a Reality mapping workspace and complete the block adjustment process, you can generate a True Ortho using the True Ortho product wizard. To create a True Ortho, a digital surface model (DSM) that is derived from the adjusted block of overlapping images is required. As a result, a DSM is generated as a part of the True Ortho generation process even if it was not previously selected as a product. The generated True Ortho is stored in the Orthos folder under the Reality Mapping category in the Catalog pane.
Once created, a True Ortho can be used to support the following:
- Basemap creation
- GIS data backdrop
- 2D heads-up digitizing
- 2D vector database updating
True Ortho’s can be generated from highly overlapping satellite, digital aerial, and drone sensor data. When using digital aerial imagery, the recommended image type for generating a True Ortho is nadir imagery. However, oblique imagery (including nadir) may also be used to enhance product quality, but the processing duration will be significantly longer when compared to using nadir imagery only.
Generate a True Ortho product
To generate a True Ortho using the ArcGIS Reality for ArcGIS Pro True Ortho wizard, follow the steps below.
Note:
For efficient processing, it is recommended that you use nadir imagery to generate True Ortho products. Before you begin the workflow, ensure that you have created a Reality mapping workspace and completed the block adjustment process.
- On the Reality Mapping tab, click the True Ortho button
 in the Product category.
The Reality Mapping Products Wizard window appears.
- Click Shared Advanced Settings button.
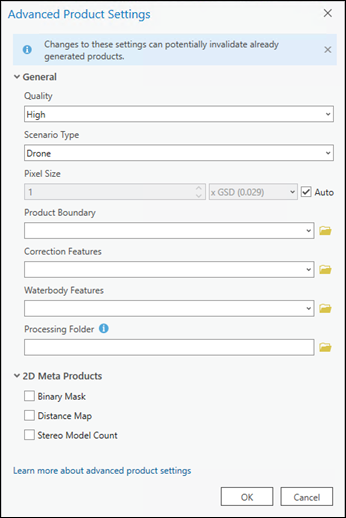
The Advanced Product Settings dialog box appears, where you can define parameters that will determine the Reality mapping products to be generated. For a detailed description of the advanced product settings options, see Shared Advanced Settings in the wizard.

- If a full resolution True Ortho product is required, ensure that Quality is set to Ultra. To manually define the True Ortho output resolution, for Pixel Size, select Meters from the drop-down menu, and provide the required pixel size.
Quality and Scenario settings are automatically set by the application and should not be changed to ensure optimum performance and product quality. However, if you want to generate a reduced resolution product, the Quality setting can be lowered. See Shared Advanced Settings for more information on the impact of various Quality settings on product generation.
Note:
The Scenario Type setting is not applicable when processing satellite images, and is not included in the Advance Settings page for the satellite sensor data type..
- For Product Boundary, select a feature class identifying the output product extent from the drop-down list or click the Browse button
 and browse to one.
 It is recommended that you provide a project boundary for the following reasons:
- Define the proper output extent—When you do not define a product boundary, the application automatically defines an extent based on various dataset parameters that may not match the project extent.
- Reduce processing time—If the required product extent is smaller than the image collection extent, defining a product boundary reduces the processing duration and automatically clips the output to the boundary extent.
- To specify a water body feature layer, click the Browse
 button next to Waterbody Features.
If water features such as lakes and rivers exist within the project area, it is recommended that you add a pre-created 3D feature class identifying those areas using the Waterbody Features option to hydrologically enforce these features in the output product. Use the stereoscopic compilation in ArcGIS Image Analyst to generate the 3D feature layer that identifies water body features. This ensures that there will be no image stretching around hydrological feature boundaries in the output due to differences in elevation between the derived DSM height and the feature class height values. A pre-existing, photogrammetrically-derived hydrological polygon layer may also be used as a Waterbody Feature layer.
- For Processing Folder click the browse button
 , navigate to disk, and define the Reality Mapping temporary folder location. The temporary files required for generating 2D or 3D products will be stored here.
 - Accept all other defaults and click OK.
The Advanced Product Settings dialog box closes, and you return to the Products Generation Settings page in the Reality Mapping Products wizard.
- Click Next in the Reality Mapping Products Wizard window to advance to the True Ortho Settings page.
- For Output Type, select either Tiled or Mosaic from the drop-down list.
- Tiled—Generates system-defined square tiled image subsets.
- Mosaic—Generates a single image covering the project area.
- Choose a Format option for the output.
- Cloud Raster Format—Generates a packaged multilayered file ideal for cloud storage.
- TIFF Format—Generates output in standard GeoTIFF format.
The default output format for tiled True Ortho products is TIFF.
- For Compression, choose one of the following:
- None—No compression is applied to the output product. This is the default option.
- LERC—Limited Error Rater Compression (LERC) is a controlled lossy compression algorithm. The rate of compression is controlled by a tolerance setting. For example, setting a tolerance of 0.001 results in a DSM value that was previously 15.654321 to be scaled to 15.654.
- Set Resampling to Bilinear.
- Resampling options are as follows:
- Nearest Neighbor—Recommended for categorical data or continuous data when you want to preserve the integrity of spectral information to be used for analysis. The value of the output pixel is determined by the nearest pixel center on the input image.
- Bilinear—Recommended for continuous data such as a DEM or imagery. It uses a weighted average of the four nearest cell centers.
- Cubic—Recommended for continuous data such as imagery. It uses the 16 nearest pixels to determine the value of the output pixel value, resulting in a slight blurring effect that is visually pleasing. This method is also known as bi-cubic convolution.
- Resampling options are as follows:
- Optionally, set a value for NoData Value that’s appropriate for the output data bit depth.
- Click Finish to initiate product processing.
When processing is complete, the True Ortho product is added to the following:
- The Data Products category and the 2D map view in the Contents pane
- The Reality Mapping container in the Orthos folder in the Catalog pane

Related topics
- Reality mapping in ArcGIS Pro
- ArcGIS Reality mapping product generation
- Generate a point cloud using ArcGIS Reality for ArcGIS Pro
- Generate a DTM using ArcGIS Reality for ArcGIS Pro
- Generate a DSM using ArcGIS Reality for ArcGIS Pro
- Generate a DSM mesh using ArcGIS Reality for ArcGIS Pro
- Generate a 3D mesh using ArcGIS Reality mapping
- Generate multiple products using ArcGIS Reality for ArcGIS Pro
- Ortho mapping product generation
- Create elevation data using the Ortho mapping DEMs wizard
- Orthorectify a single satellite scene
- Introduction to the ArcGIS Reality for ArcGIS Pro extension
- Frequently asked questions
- What is photogrammetry?