You can use the S-57 Product Manager tool to organize and manage S-57 products and their exports. The S-57 Product Manager tool can be accessed on the Maritime S-57 tab, in the S-57 Editing group. To activate the tab, you must add a feature class from a maritime geodatabase to the map.
You can do the following from the S-57 Product Manager pane:
- Create a system of series and subseries to organize products in a database.
- Move products from one series to another.
- View product footprints.
- Export a product from a geodatabase.
- Publish exported products.
- Reject exported products.
- View the compilation scale and export history for a product.
- Save exported products.

Note:
You must be the owner of the database to create and rename series, and to move products between them.
Each action is described below.
Create a series
You can use the S-57 Product Manager tool to create and organize products into series. Series are similar to folders; each series can be named, nested, and hold as many products as you choose. The product manager contains one default series named DEFAULT that holds any products that are not sorted into a named series. When new products are added to the source database, they are placed in the default series. If there are no products in the default series, it is removed when the pane is refreshed.
You can create root-level series as well as subseries under each root series.
To create a series, complete the following steps:
- Start ArcGIS Pro.
- Open a new or existing project.
- Add ENC data to the map, if necessary.
The Maritime S-57 tab appears.
- On the Maritime S-57 tab, in the S-57 Editing group, click S-57 Product Manager
 .
.The S-57 Product Manager pane appears.
- If the map contains products from more than one data source, click the Data Source drop-down arrow and choose a source.
Note:
The list of data sources is based on the data sources of the feature classes added to the map.
- Right-click in the S-57 Product Manager pane and click New Root Series.
- Provide a name for the series and press Enter.
The series is created in the S-57 Product Manager pane.
Tip:
Right-click in the pane and click Refresh to sort the series alphabetically.
Note:
Series that do not contain products are removed when the pane is refreshed.
- To create a subseries under a series, right-click the name of the existing series and click New Series.
- Provide a name for the subseries and press Enter.
The subseries is created under the existing series.
Rename a series
You can rename any series or subseries that you add to the S-57 Product Manager pane.
To rename a series, complete the following: steps
- Start ArcGIS Pro.
- Open a new or existing project.
- Add ENC data to the map, if necessary.
The Maritime S-57 tab appears.
- On the Maritime S-57 tab, in the S-57 Editing group, click S-57 Product Manager
 .
.The S-57 Product Manager pane appears.
- If the map contains products from more than one data source, click the Data Source drop-down arrow and choose a source.
Note:
The list of data sources is based on the data sources of the feature classes added to the map.
- Right-click the series you want to rename and click Rename from the context menu.
- Provide a new name for the series and press Enter.
The series is renamed and sorted alphabetically.
Move products
Products can be moved from one series to another using the Cut Product(s) option from the context menu to cut one or more products from one series and the Paste Product(s) option to paste them to another series.
To move a product, complete the following steps:
- Start ArcGIS Pro.
- Open a new or existing project.
- Add ENC data to the map, if necessary.
The Maritime S-57 tab appears.
- On the Maritime S-57 tab, in the S-57 Editing group, click S-57 Product Manager
 .
.The S-57 Product Manager pane appears.
- If the map contains products from more than one data source, click the Data Source drop-down arrow and choose a source.
Note:
The list of data sources is based on the data sources of the feature classes added to the map.
- In the S-57 Product Manager pane, right-click the products you want to move and click Cut Product(s).
Tip:
To select multiple products in the same series, press CTRL and click each series you want to move, or press Shift to select a group of products.
- Right-click the name of the series you want to move the product to and click Paste Product(s).
The product is moved to the chosen series.
View product footprint
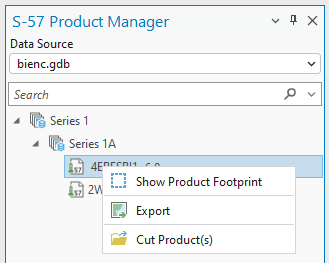
You can select a product in the S-57 Product Manager pane to view its footprint on the map. When viewing product footprints, the footprints are added to the Product Footprint group layer and subgroups are created for each product if they do not currently exist on the map. You can turn the footprint layers off and on in the Contents pane.
To view a product footprint, complete the following steps:
- Start ArcGIS Pro.
- Open a new or existing project.
- Add ENC data to the map, if necessary.
The Maritime S-57 tab appears.
- On the Maritime S-57 tab, in the S-57 Editing group, click S-57 Product Manager
 .
.The S-57 Product Manager pane appears.
- If the map contains products from more than one data source, click the Data Source drop-down arrow and choose a source.
Note:
The list of data sources is based on the data sources of the feature classes added to the map.
- In the S-57 Product Manager pane, right-click the product with the footprint you want to view and click Show Product Footprint.
The product footprint is added to the Product Footprint group layer and the footprint is shown on the map.
Export products
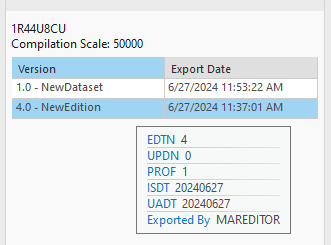
You can use the Export Geodatabase to S-57 tool to export products from the S-57 Product Manager pane. You can view export history for products in the lower half of the pane, where export history is ordered by date, with the most recent export listed first.
You can export the following product types:
- New Dataset—A new dataset including information that has not been previously distributed by updates will be created.
- New Edition—A new edition of a dataset including information that has not been previously distributed by updates will be created.
- Update—Changes to a dataset since the last export will be reflected in the file.
- Reissue—A reissue of a dataset including all the updates applied to the original dataset up to the date of reissue will be created. A reissue does not contain information that has not been previously issued by updates.
- Cancel—When a dataset is deleted, an updated cell file is created containing only the Dataset General Information record with the Dataset Identifier (DSID) field. In this case, the Edition Number (EDTN) subfield must be set to 0.
Keep the following in mind:
- When a product is exported, its status changes from published to unpublished.
- You can only generate sample exports from unpublished products.
- Sample exports are not stored.
To export a product from the S-57 Product Manager pane, complete the following steps:
- Start ArcGIS Pro.
- Open a new or existing project.
- Add ENC data to the map, if necessary.
The Maritime S-57 tab appears.
- On the Maritime S-57 tab, in the S-57 Editing group, click S-57 Product Manager
 .
.The S-57 Product Manager pane appears.
- If the map contains products from more than one data source, click the Data Source drop-down arrow and choose a source.
Note:
The list of data sources is based on the data sources of the feature classes added to the map.
- In the S-57 Product Manager pane, right-click the product that you want to export and click Export.
The Export Geodatabase to S-57 tool opens in the Geoprocessing pane and the Source Geodatabase, S-57 Product, and Output Location parameters are populated with information from the product selected in the S-57 Product Manager pane.
View and save export history
The Product Manager pane displays information about export history and the compilation scale for a selected product. You can view details about an export by hovering over a row in the export history table.

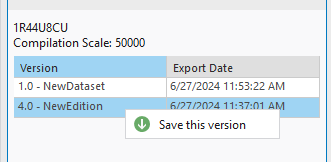
You can also save exported S-57 products from the S-57 Product Manager pane.
To view and save exports, complete the following steps:
- Start ArcGIS Pro.
- Open a new or existing project.
- Add ENC data to the map, if necessary.
The Maritime S-57 tab appears.
- On the Maritime S-57 tab, in the S-57 Editing group, click S-57 Product Manager
 .
.The S-57 Product Manager pane appears.
- If the map contains products from more than one data source, click the Data Source drop-down arrow and choose a source.
Note:
The list of data sources is based on the data sources of the feature classes added to the map.
- In the S-57 Product Manager pane, click a product to view its export history.
The export history for the selected product appears in the lower half of the pane.
- To save an export, right-click the row for the version you want to save and click Save this version.

- In the Save S-57 Cell dialog box, browse to the location where you want to save the product and provide a name for the S-57 cell file in the File name text box.
- Click Save.
The exported product is saved as a .zip file at the specified location.
After a product is exported, you can either publish or reject the export.
To publish or reject an exported product, follow the steps in the section below.
Publish or reject products
When S-57 products are imported to a geodatabase, they are published as part of the import process. However, when the product is exported it is unpublished. You can publish exported products from the S-57 Product Manager pane.
To publish an exported product, complete the following steps:
- Start ArcGIS Pro.
- Open a new or existing project.
- Add ENC data to the map, if necessary.
The Maritime S-57 tab appears.
- On the Maritime S-57 tab, in the S-57 Editing group, click S-57 Product Manager
 .
.The S-57 Product Manager pane appears.
- If the map contains products from more than one data source, click the Data Source drop-down arrow and choose a source.
Note:
The list of data sources is based on the data sources of the feature classes added to the map.
- Do one of the following:
Right-click the product name and click Reject to delete the last export.
The export is deleted from the ProductExports table and the metadata in the ProductDefinitions table rolls back to the last export.
-
Right-click the product and click Publish Exported Cell.
When a product export is published, the Published field is updated in the ProductDefinitions table, and the product is marked Published
 in the S-57 Product Manager pane.
- Optionally, enable automatic publishing for exported products by doing the following:
- In the Catalog pane, right-click the ProductDefinitions table and click Data Design > Fields.
- For the Published row, set the Default field value to True.
- Close the Fields: ProductDefinitions table.