Summary
The Iterate Multivalue tool iterates over a list of values.
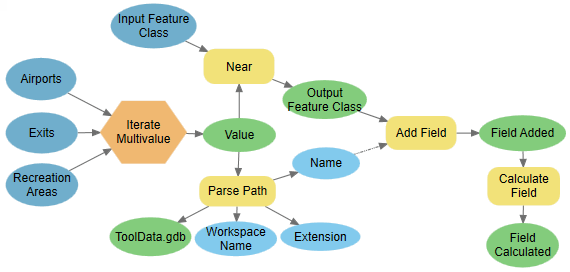
In this workflow, the Iterate Multivalue iterator is used to iterate over airports, freeway exits, and recreational areas feature classes. The other input is a point feature class, and the model calculates the closest distance of each point in the feature class to the airports, freeway exits, and recreational areas using the Near tool. The Near tool adds a field with the distance value for each input point to the nearest feature in a feature class, and the field values are overwritten for each iteration. To avoid losing the distance value after each iteration, the model adds a field and copies the distance values using the Calculate Field tool. The Parse Path tool is used to extract the name of the near feature class (airport, exits and recareas). These names are then used as field names in the Add Field tool.
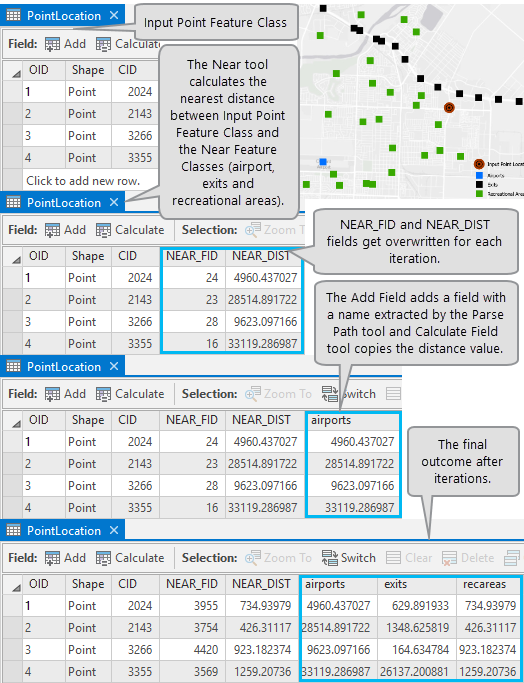
This illustration shows a subset the map of the input point feature class and all the feature classes for which the near distance will be calculated. The attribute table of the input point feature class shows the field added and values calculated for each of the input near feature classes.
Prerequisites
If you are new to ModelBuilder, review the following topics:
Open the project
Download the project to use in this workflow. The project includes input data and a completed model.
- Open the Work with Iterate Multivalue overview page.
- Click Download on the right side of the page.
- Right-click the downloaded IterateMultivalue.zip file and extract it to a convenient location, such as C:\Temp.
- In the extracted folder, IterateMultivalue, double-click the ArcGIS Pro project file, IterateMultivalue.aprx.
- Explore the data in the Catalog pane, and click the Project tab if necessary. Browse to Folders > IterateMultivalue.
The ToolData.gdb geodatabase contains the data that will be used as model inputs. The model updates the PointLocation feature class attribute table.
Add tools
You'll create a model in the MyProjectTools toolbox. To add tools to the model, complete the following steps:
- In the Catalog pane, click the Project tab if necessary. Browse to Folders > IterateMultivalue > MyProjectTools.
- Right-click MyProjectTools and click New. Select Model to create and open a model.
- Add the Iterate Multivalue tool.
- On the ribbon, click the ModelBuilder tab.
- In the Insert group, click Iterators
 .
. - In the Iterators list, click Iterate Multivalue.
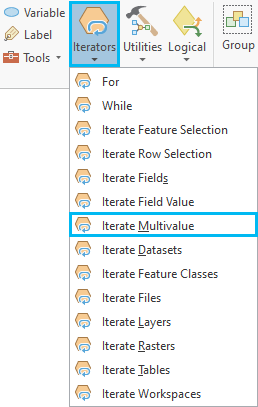
This adds the Iterate Multivalue iterator to the model. The iterator is gray since no parameter values have been provided.
- Add the Parse Path tool.
- On the ribbon, click the ModelBuilder tab.
- In the Insert group, click Utilities
 .
. - In the Utilities list, click the Parse Path tool.
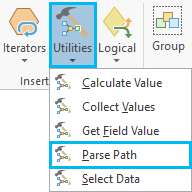
This adds the Parse Path tool to the model.
- Add the Near tool.
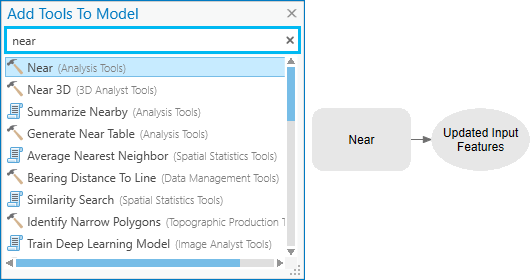
- Click in the model, and type Near directly in the model to open the Add Tools To Model dialog box.
- Search for the Near tool.
- Double-click the Near tool and add it to the model.
- In the same way as the previous step, add the Add Field and Calculate Field tools to the model.
Specify the tool parameters and connect the tools
After adding tools to the model, you'll need to specify the parameters for each tool.
- Double-click the Iterate Multivalue iterator to open the iterator's dialog box. For the Input Values parameter, browse to <Your Project Location>\IterateMultivalue\ToolData.gdb and select the airports, exits, and recareas feature classes and click OK.
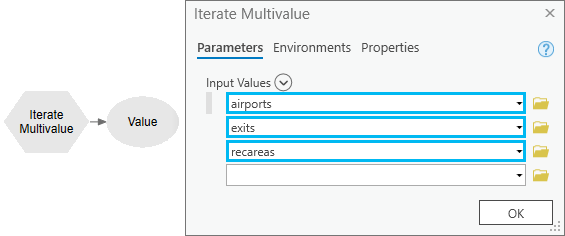
This adds the input feature classes as model variables in the model (dark blue ovals) and changes the color of the iterator indicating that the required parameters have been supplied and it is ready to run.
- Right-click the output of the iterator and click Rename. Type Value for the name and press Enter. This renames the output variable of the iterator.
- Double-click the Near tool to open the tool's dialog box.
- For the Input Features parameter, browse to <Your Project Location>\IterateMultivalue\ToolData.gdb and select the PointLocation feature class.
- For the Near Features parameter, choose the Value from the drop-down list.
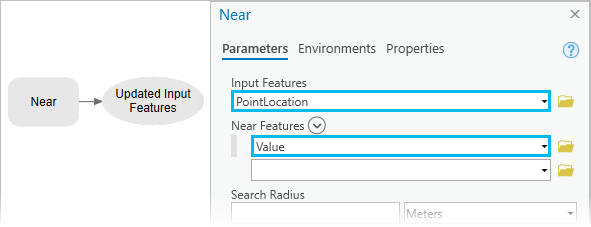
Leave the rest of the parameters as default and click OK. This creates a connection between the output value of the iterator and the Near tool.
- Double-click the Parse Path tool to open its dialog box and select Value from the drop-down list for the Input Values parameter.

This creates a connection between the output of the iterator and the Parse Path tool.
- Hover over the Near tool output variable (green oval). Click and drag to draw a connector line to the Add Field tool. Release the mouse and click Input Table on the pop-up menu.
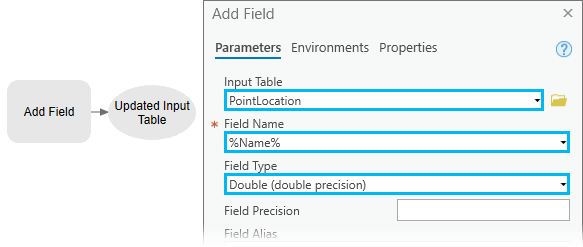
- Double-click the Add Field tool to open the tool's dialog box.
- The Input Table parameter is already added from the output of the Near tool.
- For the Field Name parameter, type %Name% as an inline variable substitution.
At run time, the name of the feature class, either airports, exits, or recareas, will be used as a field name.
- For the Field Type parameter, select Double (double precision) from the drop-down list.
Leave the rest of the parameters as default and click OK.
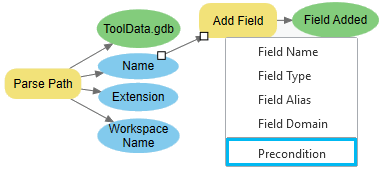
- In ModelBuilder, a tool honors the hierarchy and runs only if the upstream tool to which it is connected runs first. The Add Field tool uses the output Name parameter value of the Parse Path tool in its Field Name parameter but is not connected to it and would fail if it does not find the field name. To run the Parse Path tool before the Add Field tool, such that the name is available, a precondition must be set on the Add Field tool.
Hover over the Parse Path tool output variable Name. Click and drag to draw a connector line to the Add Field tool. Release the mouse and click Precondition on the pop-up menu.
- Hover over the Add Field tool output variable (green oval). Click and drag to draw a connector line to the Calculate Field tool. Release the mouse and click Input Table on the pop-up menu.
- Double-click the Calculate Field tool to open the tool's dialog box.
- The Input Table parameter is already added from the output of the Add Field tool.
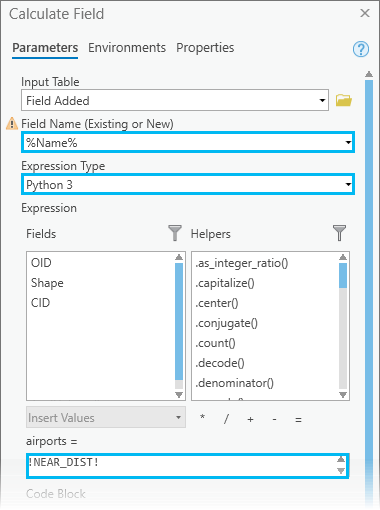
- For the Field Name parameter, select %Name% from the drop-down list. This is the field added by the Add Field tool. At run time, the variable name between the percent signs will be replaced by the actual name of the field.
- For the Expression type parameter, select Python 3
- For the Expression parameter, type !NEAR_DIST!.
Values of the NEAR_DIST field will be copied to the new field. You cannot select NEAR_DIST from the list of Fields because the field does not exist since the Near tool has not run yet. Typing the field name like this requires prior knowledge of the tool and the output field that the tool is going to create. The exclamation points before and after the field name are field delimiters for Python expressions.
- Rename all the model variables as shown in the finished model.
- To arrange the model elements, click the Auto Layout button
 on the ModelBuilder tab and click the Fit To Window button
  to maximize the layout to the size of your model window.
Run the model
You'll validate and run the model. You'll examine the outputs in the input point feature class attribute table and confirm that the nearest distance values from all three feature classes are added.
- Right-click the output of the Calculate Field tool, and click Add To Display
This adds the updated input feature class to the map.
- Click the Save button
 on the ModelBuilder tab to save the model.
 - Click the Run button
 on the ModelBuilder tab to run the model. The model will iterate over all three features classes and find the closest distance for each feature class to the point features. Right-click the input feature class in the ArcGIS Pro Contents pane and click Tables to see the added fields with nearest distance values.
 - Close the model and ArcGIS Pro.
