You can publish a topology as part of a web feature layer (feature service) that references a registered enterprise geodatabase.
Learn how to create a topology
Note:
The workflow outlined below is only supported when your data is registered as branch versioned and the topology in the web feature layer will be consumed, edited, and validated through a services-oriented architecture using a feature service.When you include the topology, you can add the web feature layer to a map in ArcGIS Pro to validate the topology and correct error features. Currently, when you add the web feature layer to any other client, you cannot access the topology through the feature service.
To publish the topology as part of a web feature layer, the data and your map must meet the requirements described below.
Prepare for publishing
When you publish and consume a topology in the web feature layer, conditions and prerequisites apply. Before you add the topology and the feature classes that participate in the topology to the map, follow the steps below to ensure that the data meets these requirements and to prepare your environment for the publishing process.
- The feature classes that participate in the topology must be registered for branch versioning.
- You cannot apply a definition query to any of the feature classes that participate in the topology.
- All fields, including subtype fields, must be visible in each feature class that participates in the topology; you cannot hide these fields. Subtype fields must also be editable.
- Before you add your topology to the map, set the versioning type of your geodatabase connection to Branch and register the feature dataset, which contains the topology and the feature classes that participate in the topology, as branch versioned.
Note:
- Branch versions can only be edited using feature services. If the versioning type of your geodatabase connection is not set to branch versioning, you cannot edit your topology once it's published.
- If you switch from traditional to branch versioning with your topology already in the map, you must add your topology to a new map to detect the new database connection properties.
- Right-click the topology in the Catalog pane, and click Add To New Map to add the topology to a new map.
You do not need to add each associated layer to the map. When you add the topology to the map, all associated layers are added as well.
Note:
- All feature classes that participate in the topology must be added to the map before you publish. Each feature class can only be added to the map once. For example, if you add the same feature class to the map twice so you can apply different symbology to each layer, you cannot publish the topology in the feature service.
- The data owner of the topology must add the topology to the map before you publish.
- You can have only one topology in the map before you publish.
- Register your enterprise geodatabase as a data store with your server. The topology in the web feature layer must reference data from registered data sources.
You can also register your enterprise geodatabase as a data store when publishing or analyzing your data. An analyzer error message appears in the Share As Web Layer pane if your database is not registered with the server. To register your data sources, click Options > Register Data Source wIth Server on the error message.
Publish the topology as a feature layer
To publish a topology as part of a web feature layer, follow these steps. See Share a web feature layer for a detailed workflow that references registered data to a federated server on your active portal.
- Ensure that the topology and all its associated feature classes are added to the current map view.
- Click the Web Layer drop-down arrow on the Share tab and click
Publish Web Layer.
Note:
The topology in the map must be connected to the default version for publishing.
- In the Share As Web Layer pane, add a web layer name, a summary, and tags, which are the minimum required attributes when publishing web layers.
- Under Data and Layer Type, confirm that Map Image is selected under Reference registered data. Click Feature to share the web feature layer as a dependent layer to the map image layer.
- Under Location, choose where to share your data.
- Under Share with, choose who you want to share this service with.
- On the Configuration tab, under the Configure Layers icon
 , check the Version Management and Validation check boxes under Capabilities.
Note:
- You must enable the Version Management and Validation capabilities to validate the topology in the web feature layer. You can disable these capabilities but, if you do, you cannot validate your topology through the feature service. Also, you cannot enable only one of these capabilities when publishing a topology as part of a web feature layer; either enable both or disable both.
- The Version Management and Validation capabilities are not available if the feature dataset containing the topology is not branch versioned. Ensure that the topology has been added to the map from a branch versioned database connection.
- You can publish the topology as a read-only feature service if both the version management and validation capabilities are unchecked.
- On the Configuration tab, under the Configure Pooling icon
 , ensure that Dedicated instance is selected under Instance Type.Shared instance pools do not support version management and validation.
 - Optionally, see configure web layer properties for the location and steps to change these default configuration.
Note:
- The Include topology layer option must be checked when you publish. If you uncheck this option, you can still publish a web feature layer, but it will not contain the topology.
- You cannot take a topology offline. If you enable sync on the web feature layer and take it offline, the topology will not be included in your offline map.
- Under Finish Sharing, click Analyze to check for problems.
Errors and warnings are listed on the Messages tab. Right-click a message to open its help topic or take corrective action in the software. Errors
 must be resolved before you can share the web layer. Resolving warnings
  is recommended but not required.
 - Once you resolve errors and optionally resolve warnings and validate, click Publish to share your web layers.
- Once the web layer has been successfully published, click the Manage the web layer link to manage the web feature layer through your portal.
Note:
Since Reference registered data was selected earlier, the Manage the web layer link opens the item page for the map image layer.Add the topology feature layer to the map
The topology is shared as a feature layer to an ArcGIS Enterprise portal. The feature service contains the topology feature layer and its associated feature classes. After publishing is complete, both the topology feature layer and map image layer are available.
To add the topology and its associated layers to the map, complete the following steps:
- Click the Portal tab in the Catalog pane.
- Locate and double-click the topology web feature layer to list the topology and its associated layers.
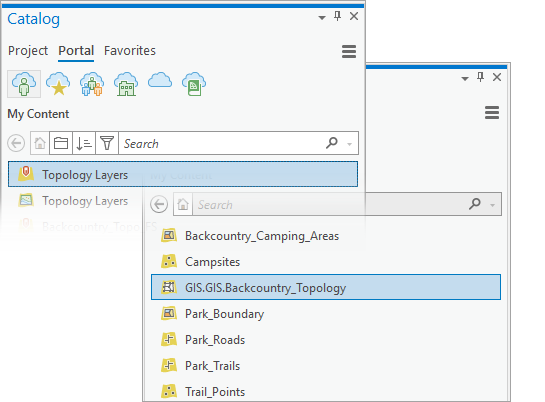
- Right-click the topology feature layer and click Add To New Map or add the topology to the current map.
Note:
When you add the topology feature layer to the map, all associated layers are automatically added as well.
View the properties of a topology feature layer
When a topology is published as a feature layer, the topology properties are read-only. For a list of available topology modification tasks, see the table in Common topology tasks.
To access and review these read-only properties, complete the following steps:
- Add the topology and its associated layers to the map.
- Right-click the topology layer in the Contents pane and click Properties, or double-click the topology layer name.
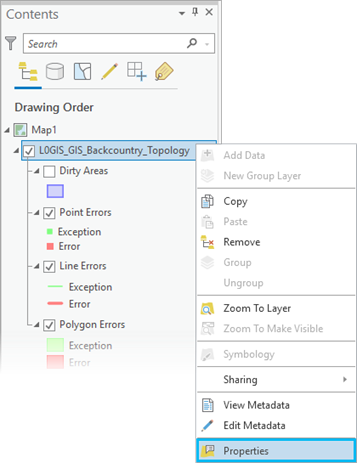
This opens the topology feature layer's properties.
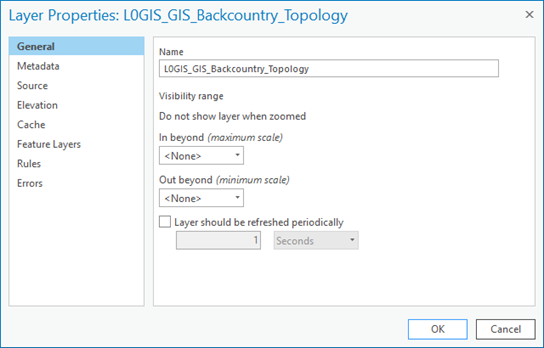
Some of the key tabs listed on the Layer Properties dialog box for the topology web feature layer include the Feature Layers, Rules, and Errors tabs. These tabs are described in more detail in the sections below.
- Click the tab containing the properties you want to view and click OK when you are finished.
Feature Layers tab
The Feature Layers tab contains the following information:
- XY cluster tolerance used in the topological processing operations
- Number of x,y ranks in the topology
- List of all feature layers associated with the topology feature layer
- XY rank assigned to each participating feature layer
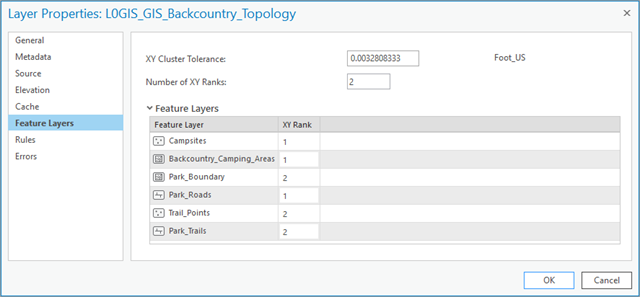
Before publishing the topology, when the topology is initially created, you rank the feature classes in the topology to control how vertices are moved when they fall within the cluster tolerance of one another. Feature classes with a rank of 1 are considered to have the highest accuracy. Coordinate ranks allow you to ensure that reliably placed vertices are the anchor locations toward which less reliable vertices are moved during topology validation. For more information, see Topology in ArcGIS.
Rules tab
Topology rules define the permissible spatial relationships between features.
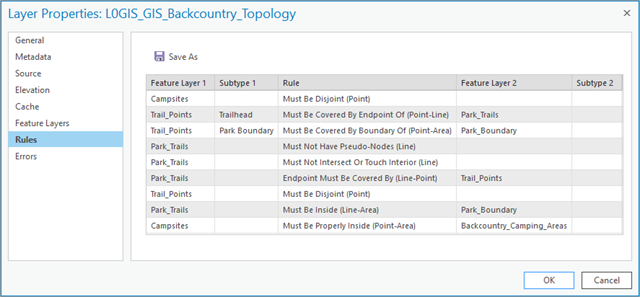
The Rules tab displays the topology rules defined on the feature layers and subtypes participating in the topology feature layer. From the Rules tab, you can save topology rules to a rule set file if needed.
Errors tab
The Errors tab includes a summary of errors and exceptions found in the topology once it is validated. If the topology has not been validated, Not Validated appears on the tab.
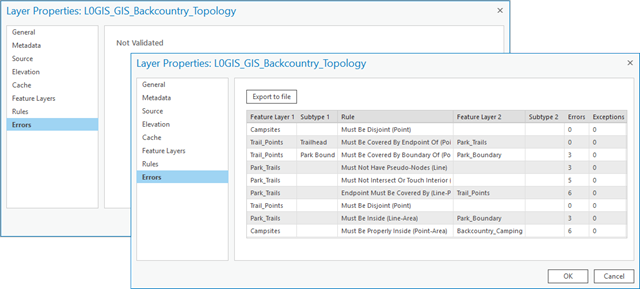
Similar to the Rules tab, the table shows the topology rules and their participating feature classes and subtypes. The errors and exceptions associated with each topology rule are displayed on the right. Errors are generated when you validate a topology and a topology rule is violated. You can click the Export to file button to save the summary as a text file to create a record of the state of the topology at a given time. This is a useful way to document and monitor progress on a large topology editing project.
Tip:
Once a topology has been published as part of a web feature layer (feature service), you can validate, edit, and fix any errors through the feature service. Learn more about validating and fixing topology errors.