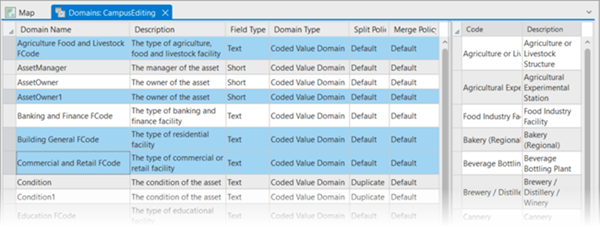
Using the Domains view, you can create domains, view existing domains, edit their properties and values, and delete domains.
Learn more about domains and their properties
While editing in the Domains view, you can browse the grid by clicking in cells, or you can use the Tab or arrow keys to move across rows and up and down columns.
The following image shows the creation of a domain called Access Type in the CampusEditing geodatabase. This domain will be used to determine the type of access permissions someone needs to enter any given building on campus. This coded values domain provides the valid access types for buildings. Once created, you can assign it to fields that share the same data type.

Open the Domains view
You can open the Domains view from the following locations:
- Ribbon—Select a layer or table in the Contents pane. On the Feature Layer tab set, click the Data tab, and click Domains in the Data Design group.
- Contents pane—Right-click a layer or table and choose Data Design > Domains.
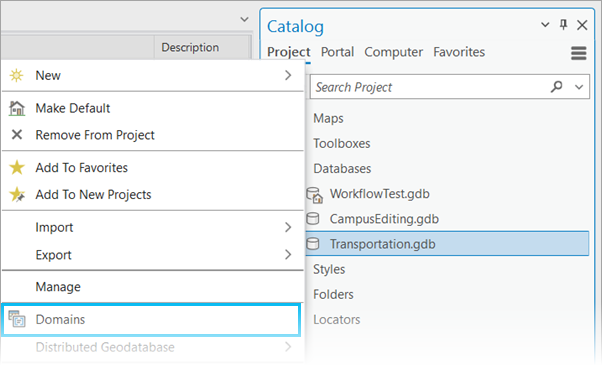
- Catalog pane—Right-click a geodatabase and click Domains, or right-click the feature class or table and choose Data Design > Domains. When choosing a feature class or table, note that the Domains view displays all of the domains associated with the geodatabase in which that feature class or table is stored.

Domains tab
The contextual Domains tab becomes available when you are in an active domains view.

Clipboard group
| Command | Description |
|---|---|
Copy | The Copy command adds one or more domains or domain values to the clipboard. |
Cut | The Cut command removes one or more domains or domain values from the origin geodatabase and adds the information to the clipboard. |
Paste | The Paste command takes the information in the clipboard whether that be one or more domains or domains values and adds the information to the destination geodatabase. |
Manage Edits group
| Command | Description |
|---|---|
Save | The Save command saves all pending edits in the active domains view. |
Discard | The Discard command discards all pending edits in the active domains view. |
Refresh | The Refresh command refreshes the active domains view with the current state of the workspace. |
Edits group
| Command | Description |
|---|---|
New | The New command adds a new domain to the domains view. |
Delete | The Delete command deletes one or more domains or domain values based on the active selection. |
Domain Usage | The Domain Usage command launches the Domain Usage pane. |
Filter group
| Command | Description |
|---|---|
Filter Text | The Filter Text box allows you to search domain properties that meet your filter conditions. |
Create a domain
To create a domain, complete the following steps:
- Video length: 0:53
- This video was created with ArcGIS Pro 3.2.
- In the Contents pane, select a layer.
The Feature Layer tab set becomes available.
- On the Data tab, in the Data Design group, click Domains
 .
.Note:
You can access the Domains view from the ribbon in the Fields view and Subtypes view.
- Click the New Domain button
 on the Domains tab.
 A row is created in the Domains view, and your pointer is positioned in the Domain Name column of that row.
- Provide a name for the new domain.
- In the Description column, provide a description for the new domain.
- In the Field Type column, choose a field type from the Field Type drop-down menu.
- Choose either Range Domain or Coded Value Domain from the Domain Type drop-down menu.
- Choose a split policy from the Split Policy drop-down menu.
- Choose a merge policy from the Merge Policy drop-down menu.
- In the grid on the right of the Domains view, provide the codes and values for a new coded value domain or the minimum and maximum range for a new range domain.
- When you are finished, click the Save button
 on the Domains tab to add the new domain to the geodatabase.
Create a domain from the Fields view or Subtypes view
You can also create domains from the Fields view and Subtypes view.
Click the drop-down menu in the Domain column for any field, and choose either Create new range domain or Create new coded value domain (the Subtypes view only shows the option to create a coded value domain). The Domains view opens with the new domain prepopulated with the properties from the field. After entering the domain properties and clicking Save on the Domains tab, the new domain is available in the Domains drop-down list in the Fields view and Subtypes view.
Apply a domain to a field
Once you have created a domain, you can assign it to a field. You can apply a domain to a field when creating a feature class using the Create Feature Class wizard. Or you can apply a domain at the existing feature class level or the subtype level using the Fields view or Subtypes view, respectively.
Note:
To switch the display between Code and Description for coded values in the attribute table, open the attribute table and click the Menu button  at the end of the table toolbar to access Show domain and subtype descriptions.
To apply a domain to a field in either view, double-click in the Domain column of the field you want to apply a domain to and select a domain from the drop-down list. You can then choose an appropriate default value from the drop-down list in the Default Value column.
If your feature class has subtypes, you can apply different attribute domains at the subtype level for the field using the Subtypes view.
Dive-in:
When a new subtype is added, any existing domains that are assigned to fields at the feature class level will be inherited by the fields on the new subtype.
Learn more about how to create and manage fields and create and manage subtypes.
Modify or delete a domain
You can associate domains with particular fields for a feature class or table or for a subtype of a feature class or table. While a domain is being used by a table or feature class, it can be modified but not deleted.
Dive-in:
Enterprise geodatabase domains—When a domain is created, the owner of that domain is recorded based on the user who created the domain. Only the owner or the geodatabase administrator can modify or delete a domain.
You can modify the following domain properties:
- Owner (Enterprise geodatabases only)
- Domain name
- Description
- Split and merge policies
- Maximum and minimum values for range domains
- Codes and values associated with coded value domains
You cannot modify the domain type or field type once a domain has been committed to the geodatabase by clicking the Save button.
To delete one or more domains in the Domains view, click the tab next to the row representing the domains you want to delete or use the Ctrl or Shift key to select multiple rows. This selects the entire row or rows. Press the Delete key, use the Delete button from the Clipboard on the Domains tab, or right-click the row and choose Delete from the context menu.
Identify domain usage
An important component of domain management is understanding the domain usage in a geodatabase. The Domain Usage pane is helpful to identify the datasets that are assigned a specific domain. Domain usage is reported for a geodatabase workspace by displaying datasets in a data grid for review. You can use the Fields and Subtypes views to explore and make changes to the domain assignment.
The Domain Usage pane is launched by clicking the Domain Usage button  on the Domains tab, or by right-clicking to access the context menu for a specific domain in the grid of the Domains view.
To access the Domain Usage pane, complete the following steps:
- Open the Domains view.
- On the Domains tab, in the Changes group, click Domain Usage
 .
. The Domain Usage pane appears with the Workspace populated.
- Choose a domain from the Domain drop-down menu.
The grid view displays the domain usage for datasets in the geodatabase by providing the following columns:
- Dataset
- Field
- Subtype
- Select the row for the domain assignment you want to manage. Right-click the leftmost column of the data grid and click View Usage
 .
. Depending on how the domain is assigned to the dataset, one of the following views opens:
- Fields view
 —Opens for datasets with the domain assigned at the field level. This applies to datasets listed with the Subtype column blank.
 - Subtypes view
 —Opens for datasets with the domain assigned at the subtype level. This applies to datasets listed with the Subtype column populated.
Tip:
Double-click the row to open the Fields or Subtypes view to explore the domain assignment.The Fields or Subtypes view opens with the domain highlighted and can be used to manage the domain assignment. You can also use tools in the Domains toolset to manage the domain properties and assignment.
- Fields view
Copy domains between datasets
If you have domains that you want to copy to another geodatabase, you can copy one or more of the domains from the origin geodatabase and paste them into the Domains view of the destination geodatabase. To copy one or multiple domains between geodatabases, complete the following steps:
- Open Domains view on the origin geodatabase that contains the domains of interest and the destination geodatabase that you want to add the domains to.
The domains view opens for the origin and destination geodatabases.
- From the origin geodatabase, select one or more domains that you want to copy.
One or more domains are selected.

Multiple domains are shown selected in the Domains view by holding the Ctrl key. Tip:
When selecting multiple domains to copy and paste, consider using the following Windows shortcuts:
- Ctrl+A to select all
- Ctrl+C to copy
- Ctrl+V to paste
To select all domains, select the first domain and while holding the Shift key, select the last domain. Then right-click the selected domains and choose Copy. You can also copy selected domains with the Copy button from the Clipboard group on the Domains tab.
- In the destination geodatabase, paste using either paste from the Clipboard, keyboard shortcut for paste, or paste within the context menu.
The copied domains display in the destination geodatabase.
- Click the Save button
 on the Domains tab.
The domains are saved in the destination geodatabase.
